
VberAI Godot MCP: Install Plugin & Enable in Godot 4
VberAI Godot MCP install: download plugin, add to addons, enable in Godot 4, start server, verify godot-mcp in Cursor or Claude Code.
- godot
- mcp
- cursor
- tutorial
- godot-mcp
- ai
- vberai
Install the VberAI Godot MCP Plugin (Godot 4)
If you searched vberai godot mcp, install godot mcp plugin, or turning on mcp in godot 4, this is the official install path: download the open-source Godot MCP plugin, drop it in addons, enable it in Project Settings, start the local server, and confirm godot-mcp in Cursor (or another MCP-capable AI IDE).
These five steps cover download → addons → enable plugin → start Server → verify in Cursor.
When you finish, you should be able to:
- Place the plugin in the project
addonsfolder and enable it in Project Settings - Start the local Godot MCP Server (default port 3000)
- Use one-click configure to register the server in Cursor and confirm godot-mcp is connected (and can list scene nodes)
Enable checklist (scan first)
- Plugin folder is at
addons/<plugin-name>/(no extra nest level) - Project Settings → Plugins: Godot MCP Server is enabled
- GodotMCP panel shows Running
- Cursor MCP list shows godot-mcp (Reload if needed)
- A read-only prompt can list root nodes of the active scene
Open-source repository: DaxianLee/godot-mcp · Product page: Godot MCP
Prerequisites
| Item | Notes |
|---|---|
| Godot | Installed, with a project you can open |
| Plugin package | godot-mcp release or source ZIP from GitHub |
| AI IDE | Cursor recommended; other MCP clients also work |
| Local network | The MCP bridge usually runs on 127.0.0.1—do not expose the port publicly |
Step 1: Download Godot MCP
Download open-source Godot MCP from GitHub:
Repository: https://github.com/DaxianLee/godot-mcp
Suggested flow:
- Open the repo and use Code → Download ZIP, or grab the latest package from Releases
- Save the archive locally and prepare to extract it
- Confirm the package looks like a Godot plugin (an
addons-related folder, or a plugin folder you can drop intoaddons)
Step 2: Add Godot MCP to Your Project
- Extract the archive on your machine
- Move the extracted plugin folder into the
addonsdirectory at the Godot project root- If
addonsdoes not exist yet, create it first
- If
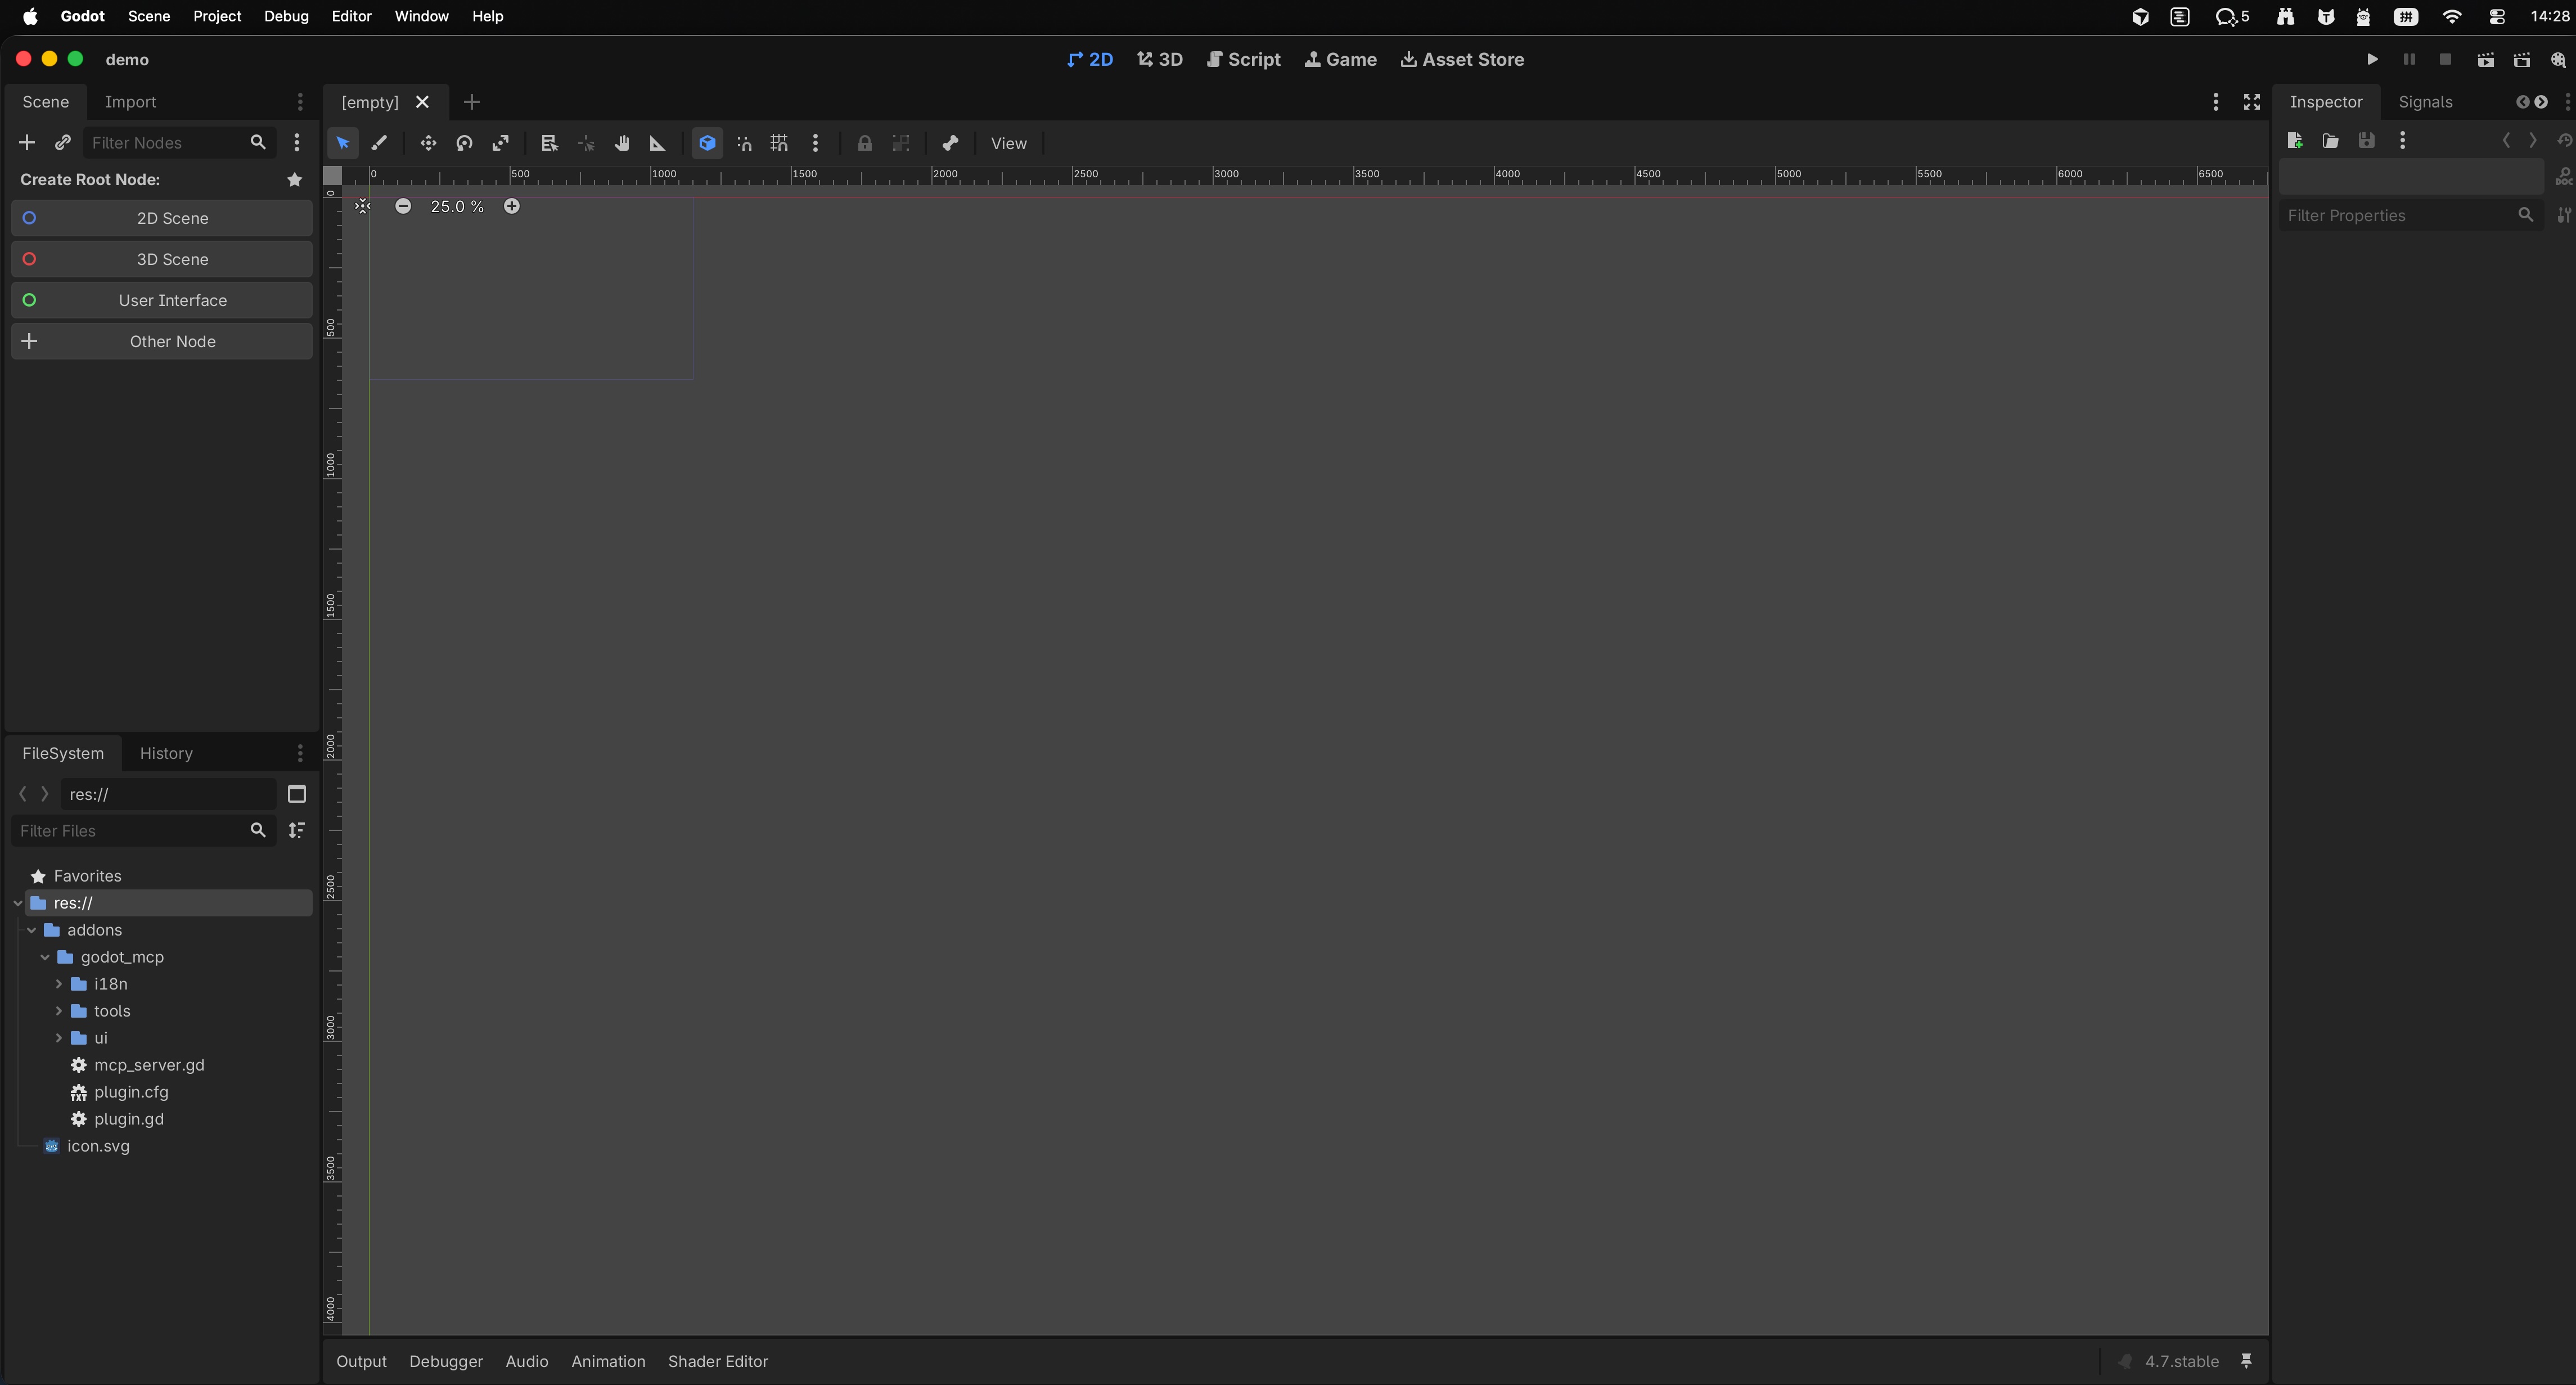
- Open (or reload) the project in Godot and confirm the plugin files appear in the FileSystem dock
Example project layout after import:
Step 3: Enable the Godot MCP Plugin in Project Settings
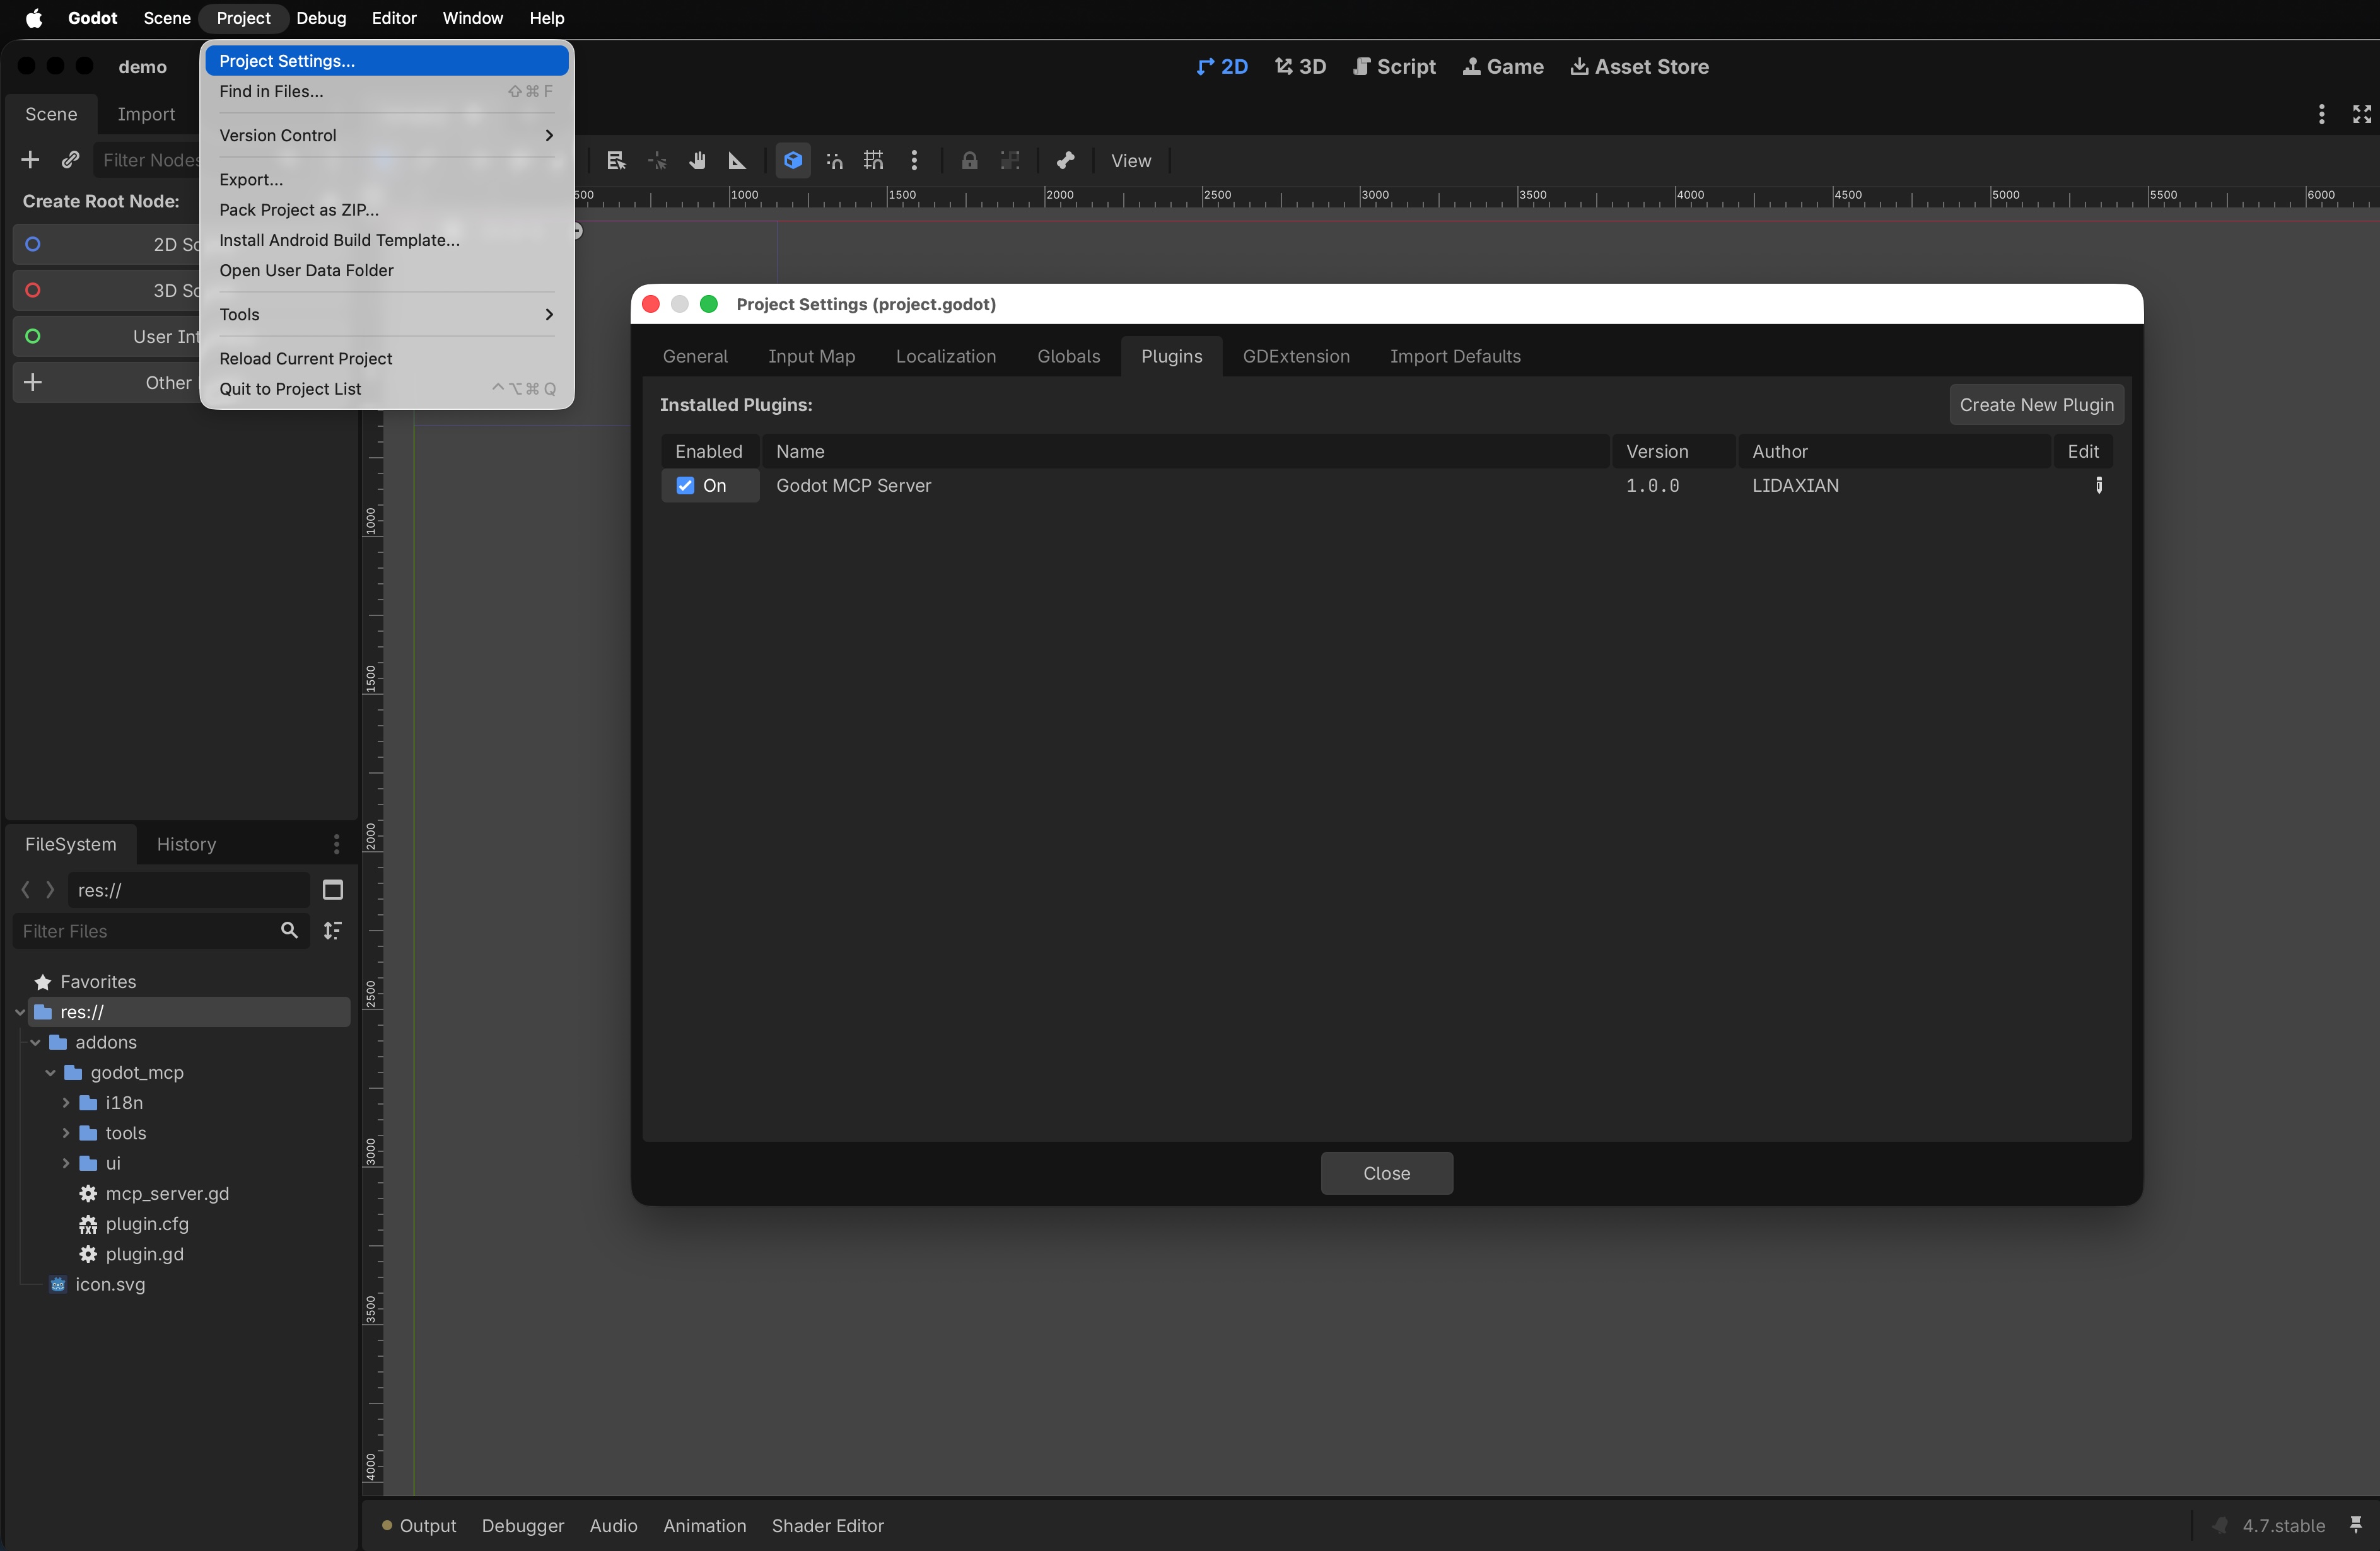
- Open Project → Project Settings (or the equivalent for your Godot version)
- Go to the Plugins tab
- Find Godot MCP Server (name may vary slightly in the UI)
- Enable it
After enabling, a Godot MCP entry should appear in a side or dock panel so you can set the port and start the server next.
Step 4: Start Godot MCP Server
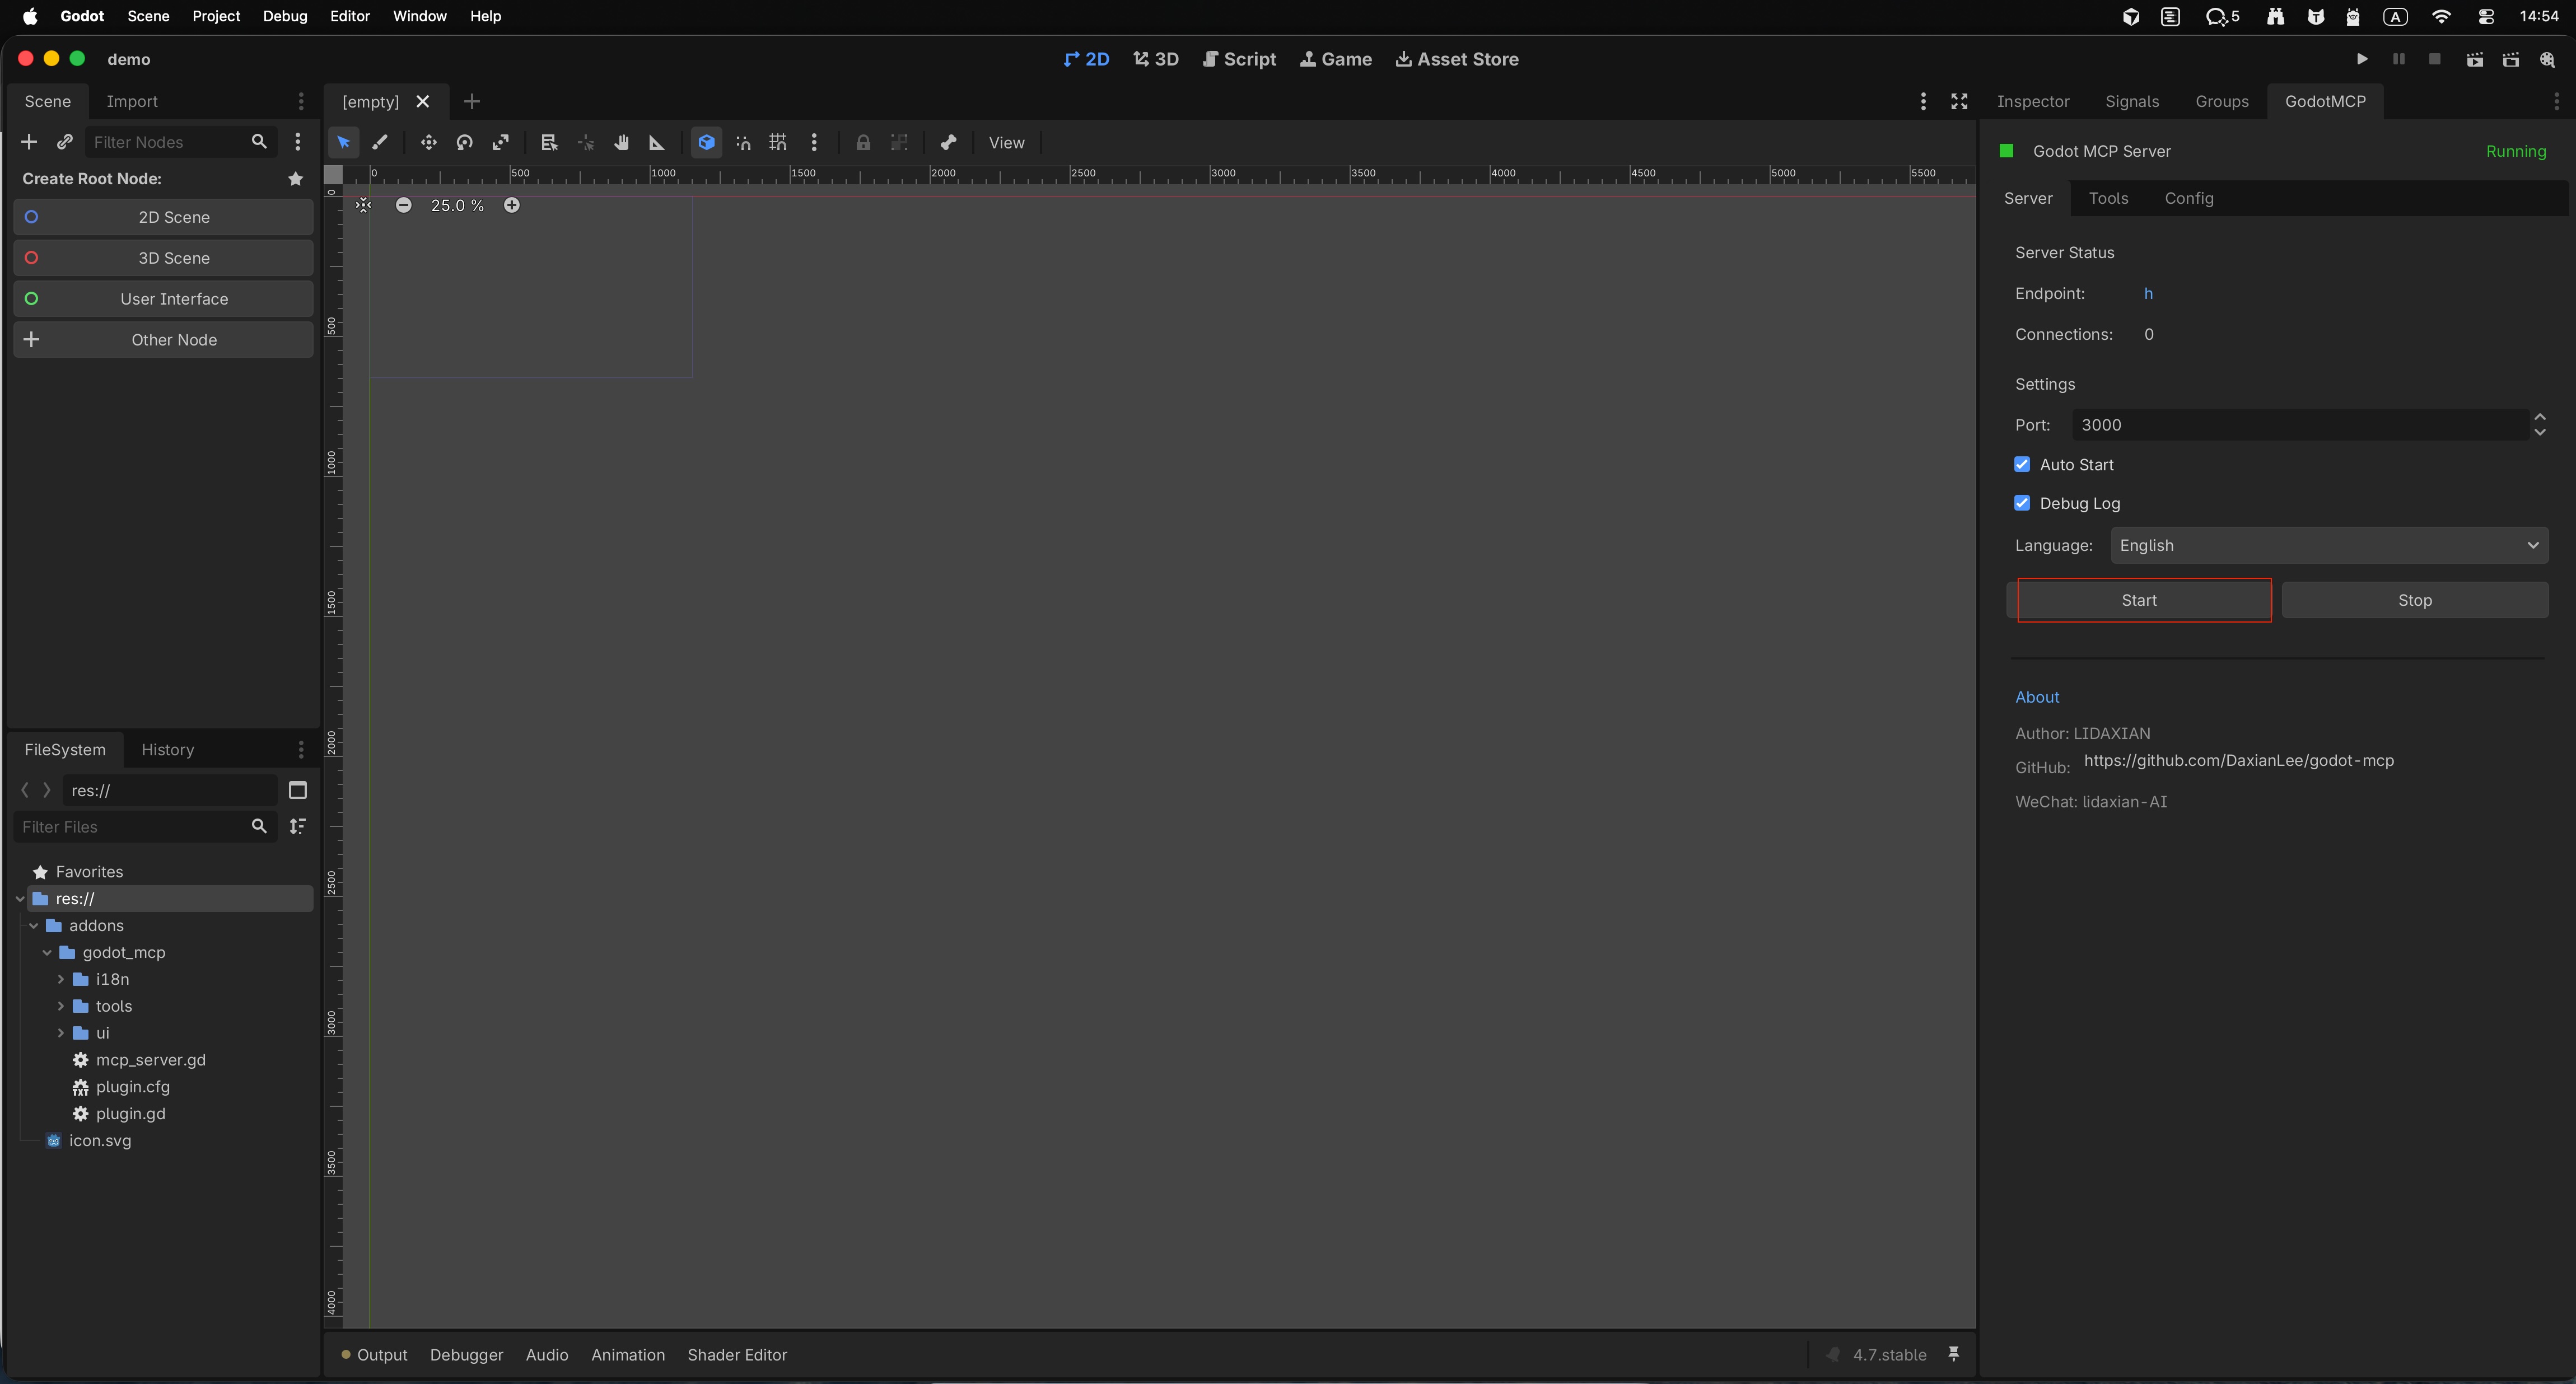
- In the Godot editor right-hand panel, open the GodotMCP dock
- Review and adjust as needed:
- Port: default
3000 - Language: pick what matches your UI preference
- Startup: you can enable auto-start so the server comes up when you open the project
- Port: default
- Click Start
- When the panel shows Running (or the localized equivalent), Godot MCP Server is up
You now have a local MCP bridge. Next, hand it to your AI IDE.
Step 5: One-Click AI IDE Setup (Cursor Example)
- In the GodotMCP panel, open Tools
- Review the tools exposed by the server
- Enable only the capabilities you want the AI to use
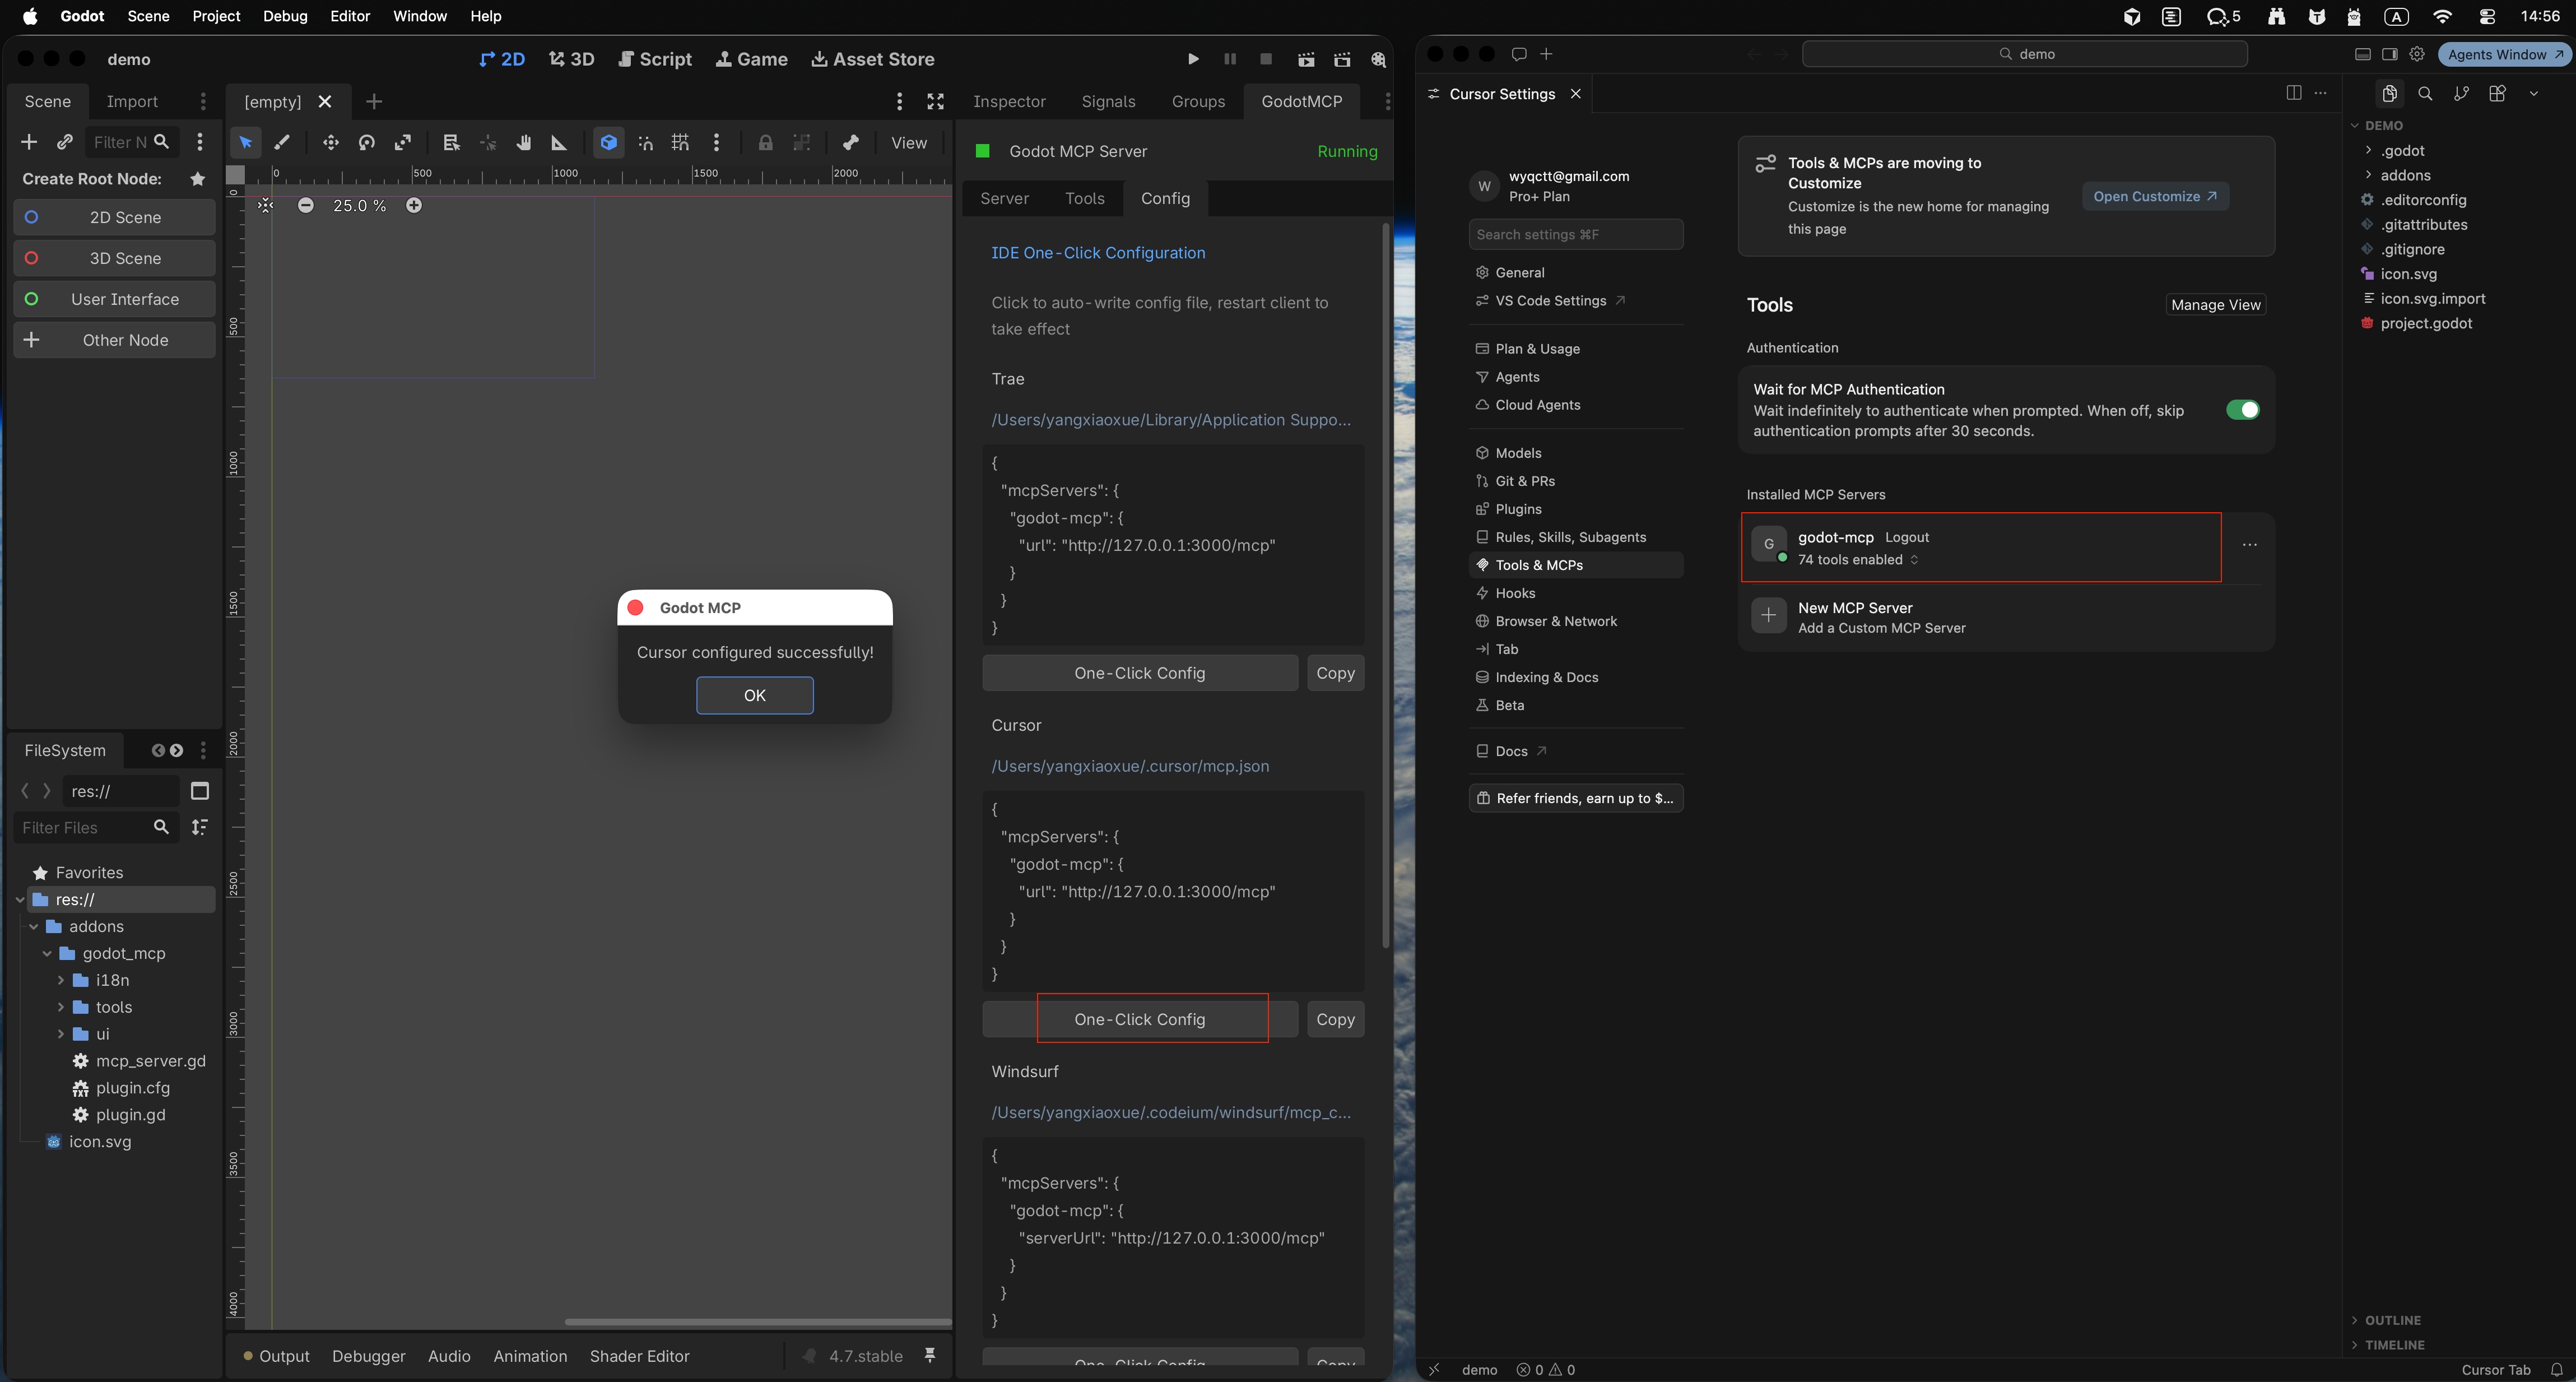
- Open Configure
- Choose your IDE (for example Cursor)
- Click One-click configure
- Wait for a configuration successful message
- Open Cursor
- In the MCP / tools list you should see godot-mcp connected automatically
- If it does not appear, click Reload (or the equivalent MCP reload action) in Cursor and check again
Configuration and connection:
Quick verification after connecting
In Cursor, start with a read-only check, for example:
List the root nodes of the active Godot scene.
If the reply matches the editor Hierarchy, the bridge works. Then try a small write (create a temporary node and delete it) to confirm permissions and tool selection.
FAQ
How do I install the Godot MCP plugin?
Download from DaxianLee/godot-mcp, place the plugin folder under your project addons/ directory, enable Godot MCP Server in Project Settings → Plugins, then start the server from the GodotMCP panel. Full walkthrough: Steps 1–5 above.
How do I turn on MCP in Godot 4?
After the plugin is in addons/, open Project → Project Settings → Plugins, enable Godot MCP Server, open the GodotMCP dock, set port (default 3000), and click Start until the panel shows Running.
What is vberai godot mcp?
VberAI Godot MCP is the product name for the open-source Godot editor bridge on vberai.com/game-engines/godot. It lets Cursor, Claude Code, and similar clients operate the open Godot editor via MCP—not only edit scripts on disk.
I copied files into addons, but Godot MCP Server is missing from the plugin list?
Make sure the folder sits at addons/<plugin-name>/ and is not nested one extra unzip level. Reload the project or restart Godot.
I clicked Start but never see Running?
Confirm port 3000 (or your custom port) is free, then retry. Check that nothing is blocking localhost.
Cursor does not show godot-mcp?
In Godot, confirm the server is still Running, run one-click configure again, then reload MCP in Cursor. If it still fails, check that Cursor’s MCP config includes the local bridge address.
Auto-start is on, but I still have to start manually?
Some builds need one successful manual start first. Confirm the checkbox is saved, then reopen the same project and verify.
Next Steps
- Use natural language for a scene query or a small edit to learn the tool boundaries
- Commit before large changes; keep the bridge on localhost only
- For design-to-engine UI handoff, pair with VberAI Studio, then iterate in-editor with MCP
For more Godot + MCP background, see How we built a real-time MCP server for Godot.
Keep reading
More guides you might like
Cocos Creator 3.x MCP Install: cocos-mcp 3.x Pro Setup Guide
Cocos Creator 3.x MCP Pro (cocos mcp 3.x pro): Extension Manager import, activate, start MCP Server, verify cocos-creator in Cursor.
- cocos
- cocos-creator
- mcp
- cursor
Floating Damage Numbers: Handoff Acceptance and Engine Implementation
Fail criteria when popups blur, miss glyphs, sort wrong, or stutter; choosing TMP vs bitmap digits, pools and Canvas order, Unity UGUI acceptance steps, and how design digit art plugs in.
- game-ui-design
- game-dev-ai
- ui-to-engine
- bitmap-font
Mobile HUD Information Hierarchy: What to Show in Combat, Lobby, and Modals
HUD visibility and priority by game state; how it ties to Safe Area, floating text layers, and modal stacking—spec tables plus Play and device acceptance steps.
- game-ui-design
- game-dev-ai
- ui-to-engine
- hud