
VberAI One-Click UI Reskin: Change Game Themes Without Moving the Layout
VberAI Studio one-click reskins full-screen game UI with presets or reference images. Layout and structure stay fixed. Gothic→Halloween and cartoon→Christmas examples.
- vberai
- ai-studio
- ui-reskin
- game-ui
- theme
- halloween
- christmas
- tutorial
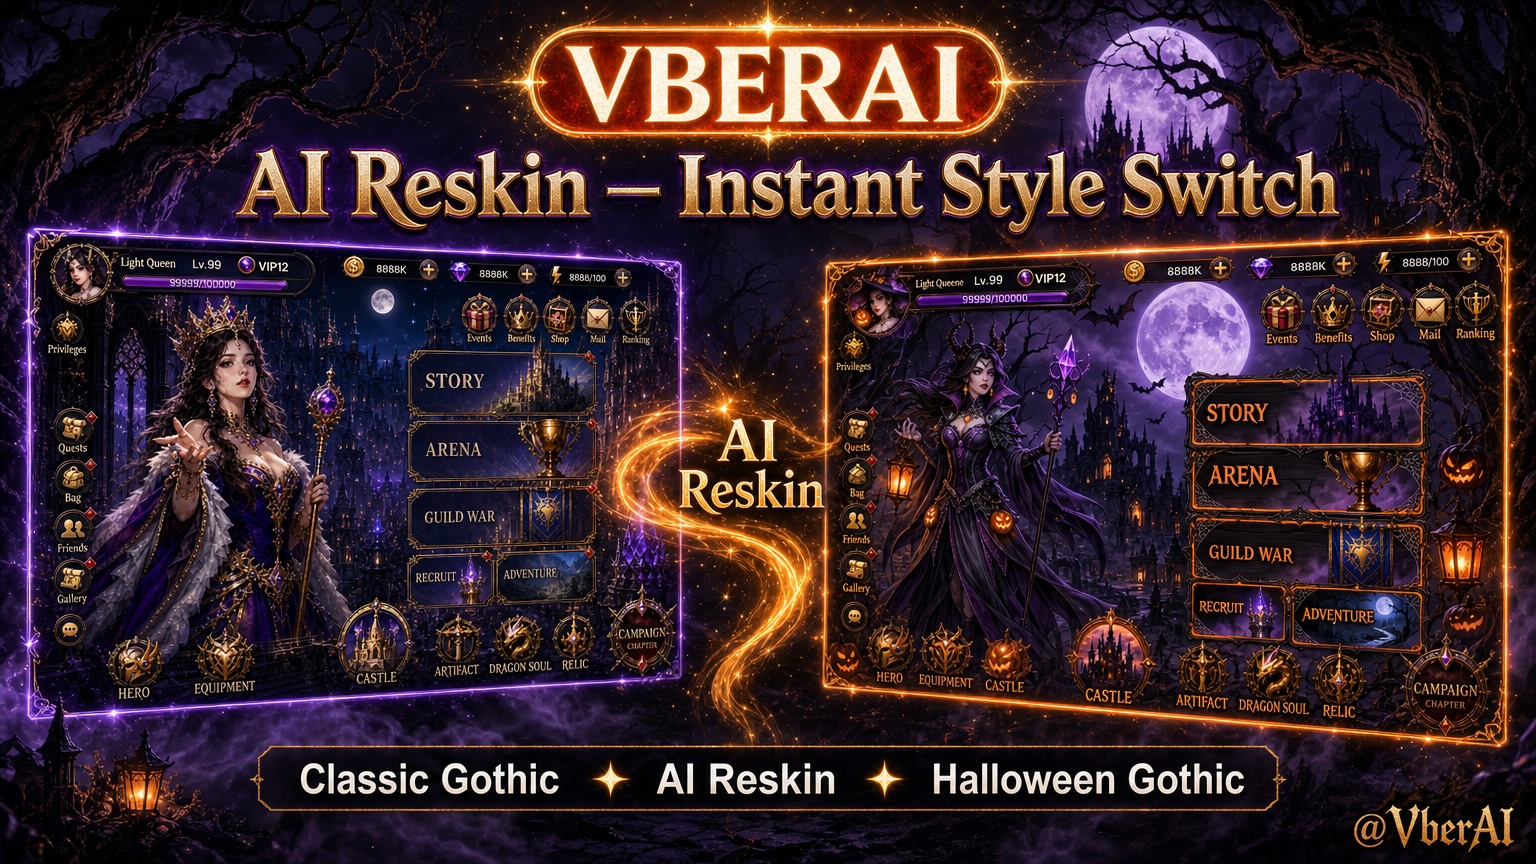
VberAI Studio (≠ Google AI Studio) supports one-click UI reskin (AI Reskin): restyle a full-screen game UI or inject theme elements (festivals, IP, event skins) while the shell stays fixed—layout, position, size, and layer order match the source one-to-one. Buttons, panels, FX, and fonts can all change look without rebuilding the screen for every event.
Guide the pass with a theme preset or a reference image. Output stays on the same game canvas; follow with in-place slicing and export to Unity / Godot / Cocos. Product: AI Studio.
Why game UI reskins are so common
Live-ops projects reuse the same main menu / HUD / shop shell for:
- Festival event skins (Halloween, Christmas, Lunar New Year, and so on)
- IP / collab skins
- Season or version theme skins
The usual path: lock the layout, redraw assets per layer, or rebuild the full screen and re-slice. Structure barely changes; cost sits in redraw and realignment. One-click reskin targets that middle stretch: keep the geometry, swap the visual language.
| Hand reskin | VberAI one-click reskin | |
|---|---|---|
| Process | Redraw per layer / rebuild screen → re-slice and align | Select artboard → preset, reference, or theme prompt → AI restyles |
| Layout | Specs + manual alignment | Structure kept one-to-one; no rearrange |
| Coverage | Often control by control | Can cover full-screen UI: panels, buttons, FX, fonts (per current Studio) |
| Best for | Pixel-level brand work | Festival skins, theme variants, fast multi-look options |
What “one-click reskin” means
In Studio terms:
- Reskin — Redraw the look and theme of a full screen (or selected artboard) without rebuilding the layout.
- Structure stays — After reskin, layout, position, size, and layer order match the source completely; no rearrange pass.
- Guidance — Use a theme preset, a reference image, or a short theme prompt (festival mood, and so on). UI labels follow the canvas toolbar.
It differs from in-place slicing: reskin changes how it looks; slicing changes whether it can enter the engine as layers. Typical chain: lock the shell → produce theme skins → slice and export.
Steps
1. Prepare a finished full-screen UI
Start with a clear main screen or HUD on the canvas (AI-generated or imported mockup). Cleaner source art makes theme props land on the right decoration layers.
2. Select the artboard and open AI Reskin
Select the screen to restyle (for example the main menu). From the selection toolbar, open AI Reskin / one-click reskin (wording per product UI).
3. Point at the target style with a preset or reference
Use any mix of:
- Theme preset — Ready festival / style directions in the library
- Reference image — Atmosphere, materials, or IP look
- Short prompt — Extra constraints such as “add jack-o’-lanterns and webs, keep the gothic dark base”
Confirm and run; time and credit cost follow the Studio panel.
4. Review: look changed, layout unchanged
Structure already matches the source one-to-one. Review the visuals:
- Theme mood and props vs the preset / reference
- Whether label colors need a unify pass (text color sometimes stays close to the source)
- When ready for engines, continue with slice / export
Case 1: Classic gothic → Halloween gothic
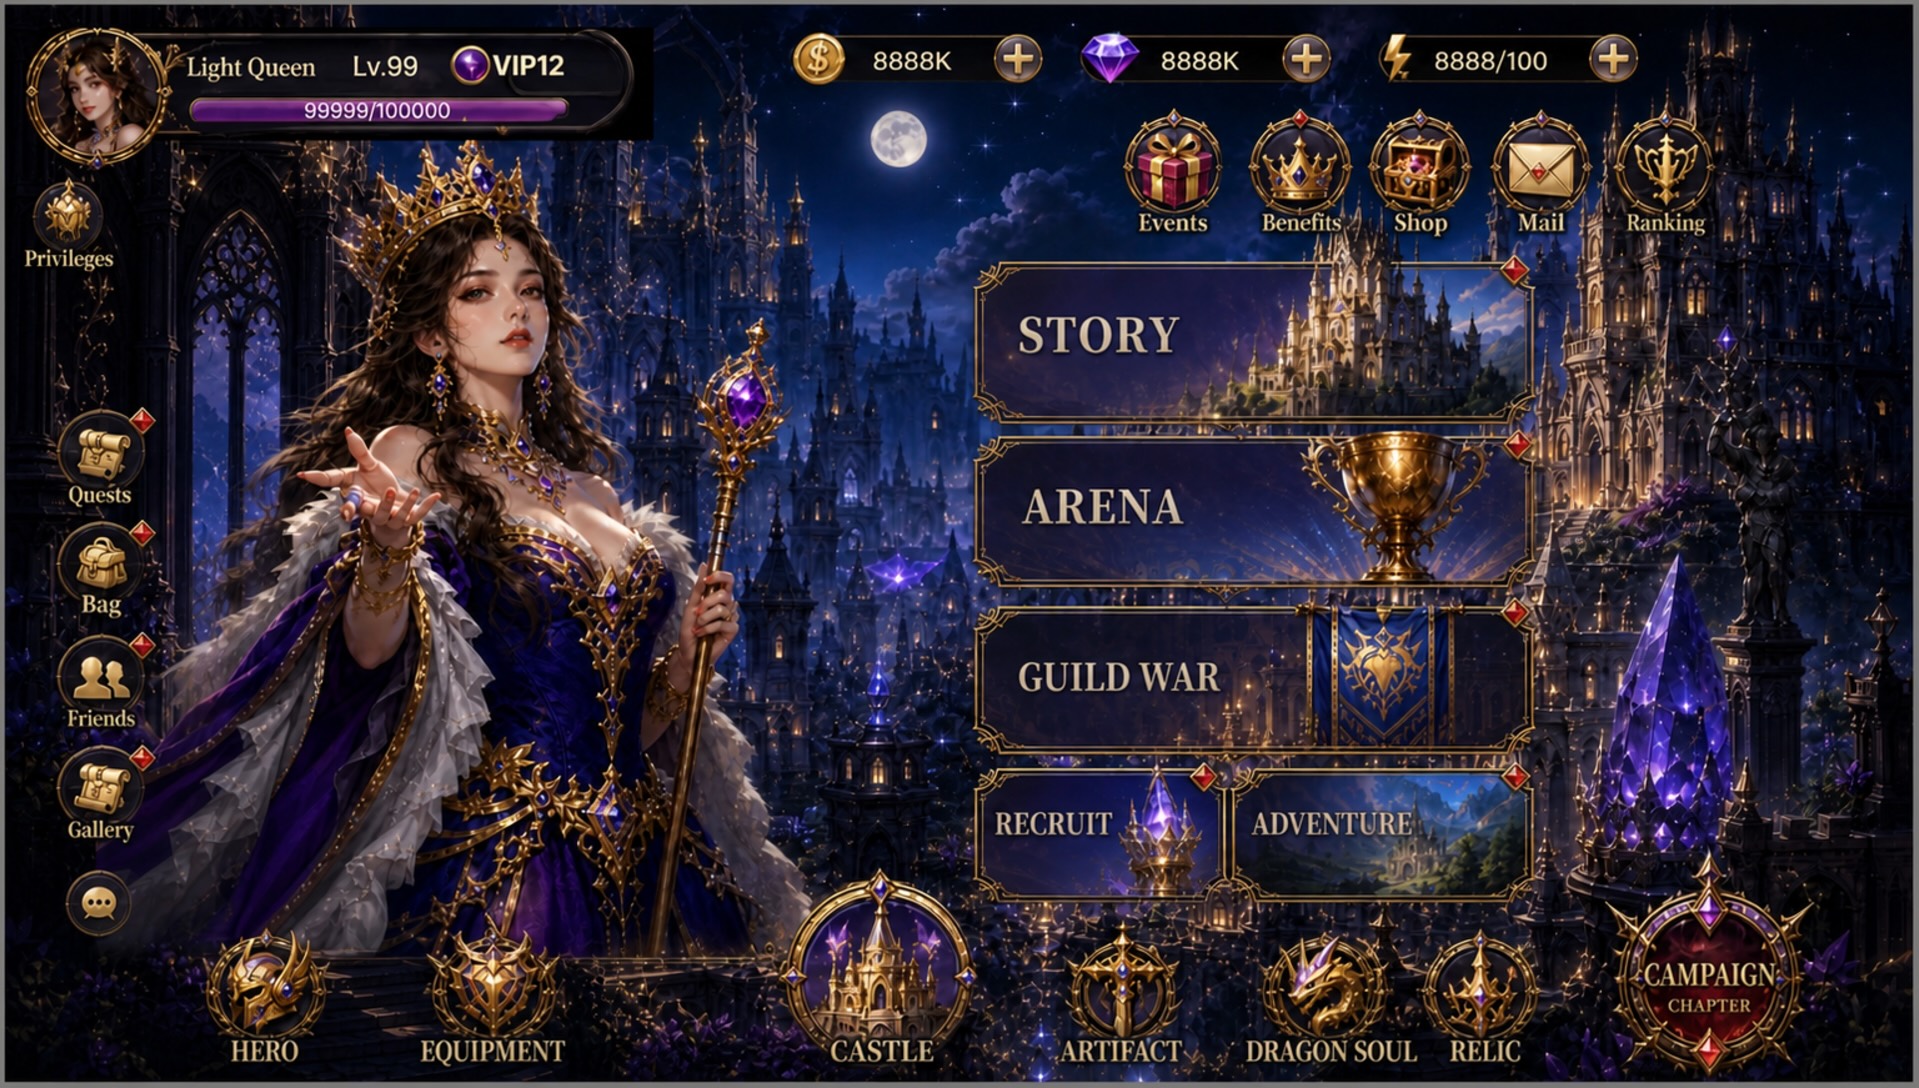
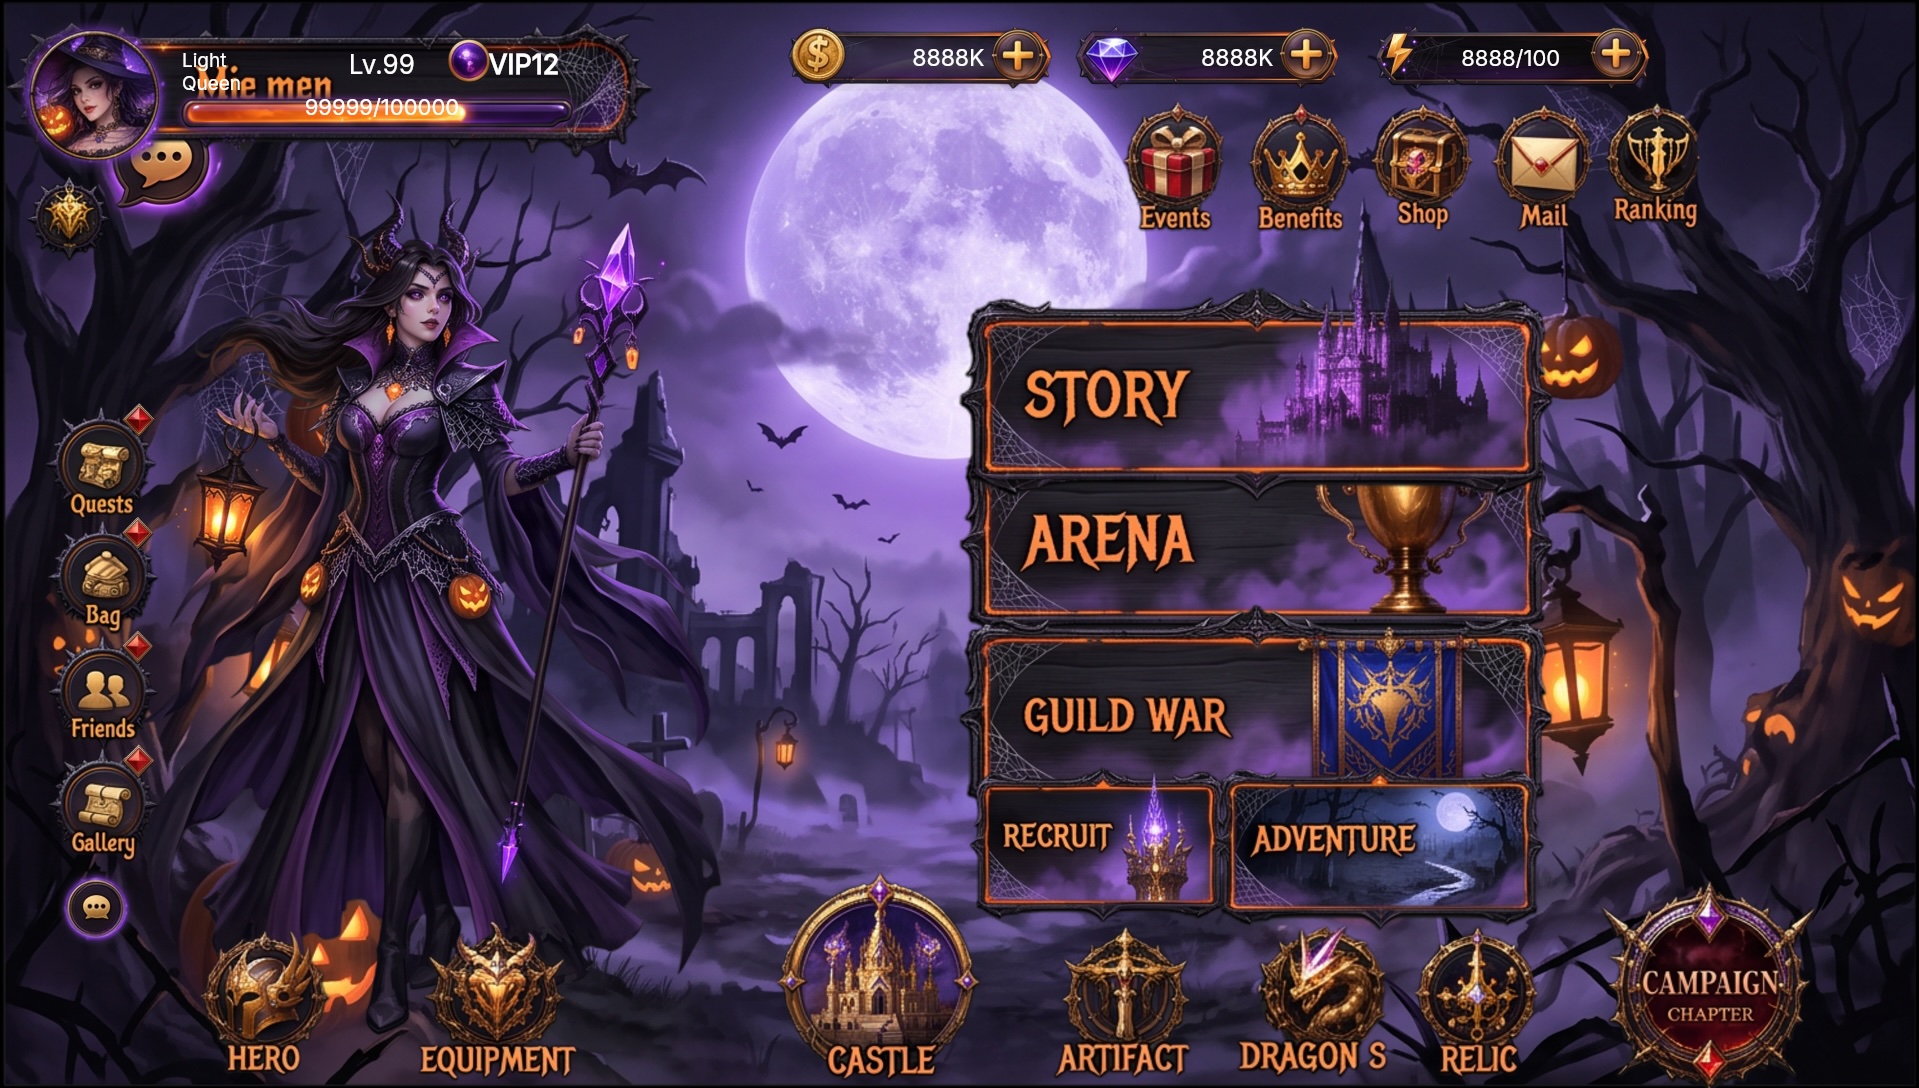
Same gothic dark UI shell; preset or reference injects Halloween props (pumpkins, webs, candlelight) into a Halloween gothic event skin. Menu and panel layout stay put; only mood and decoration change.
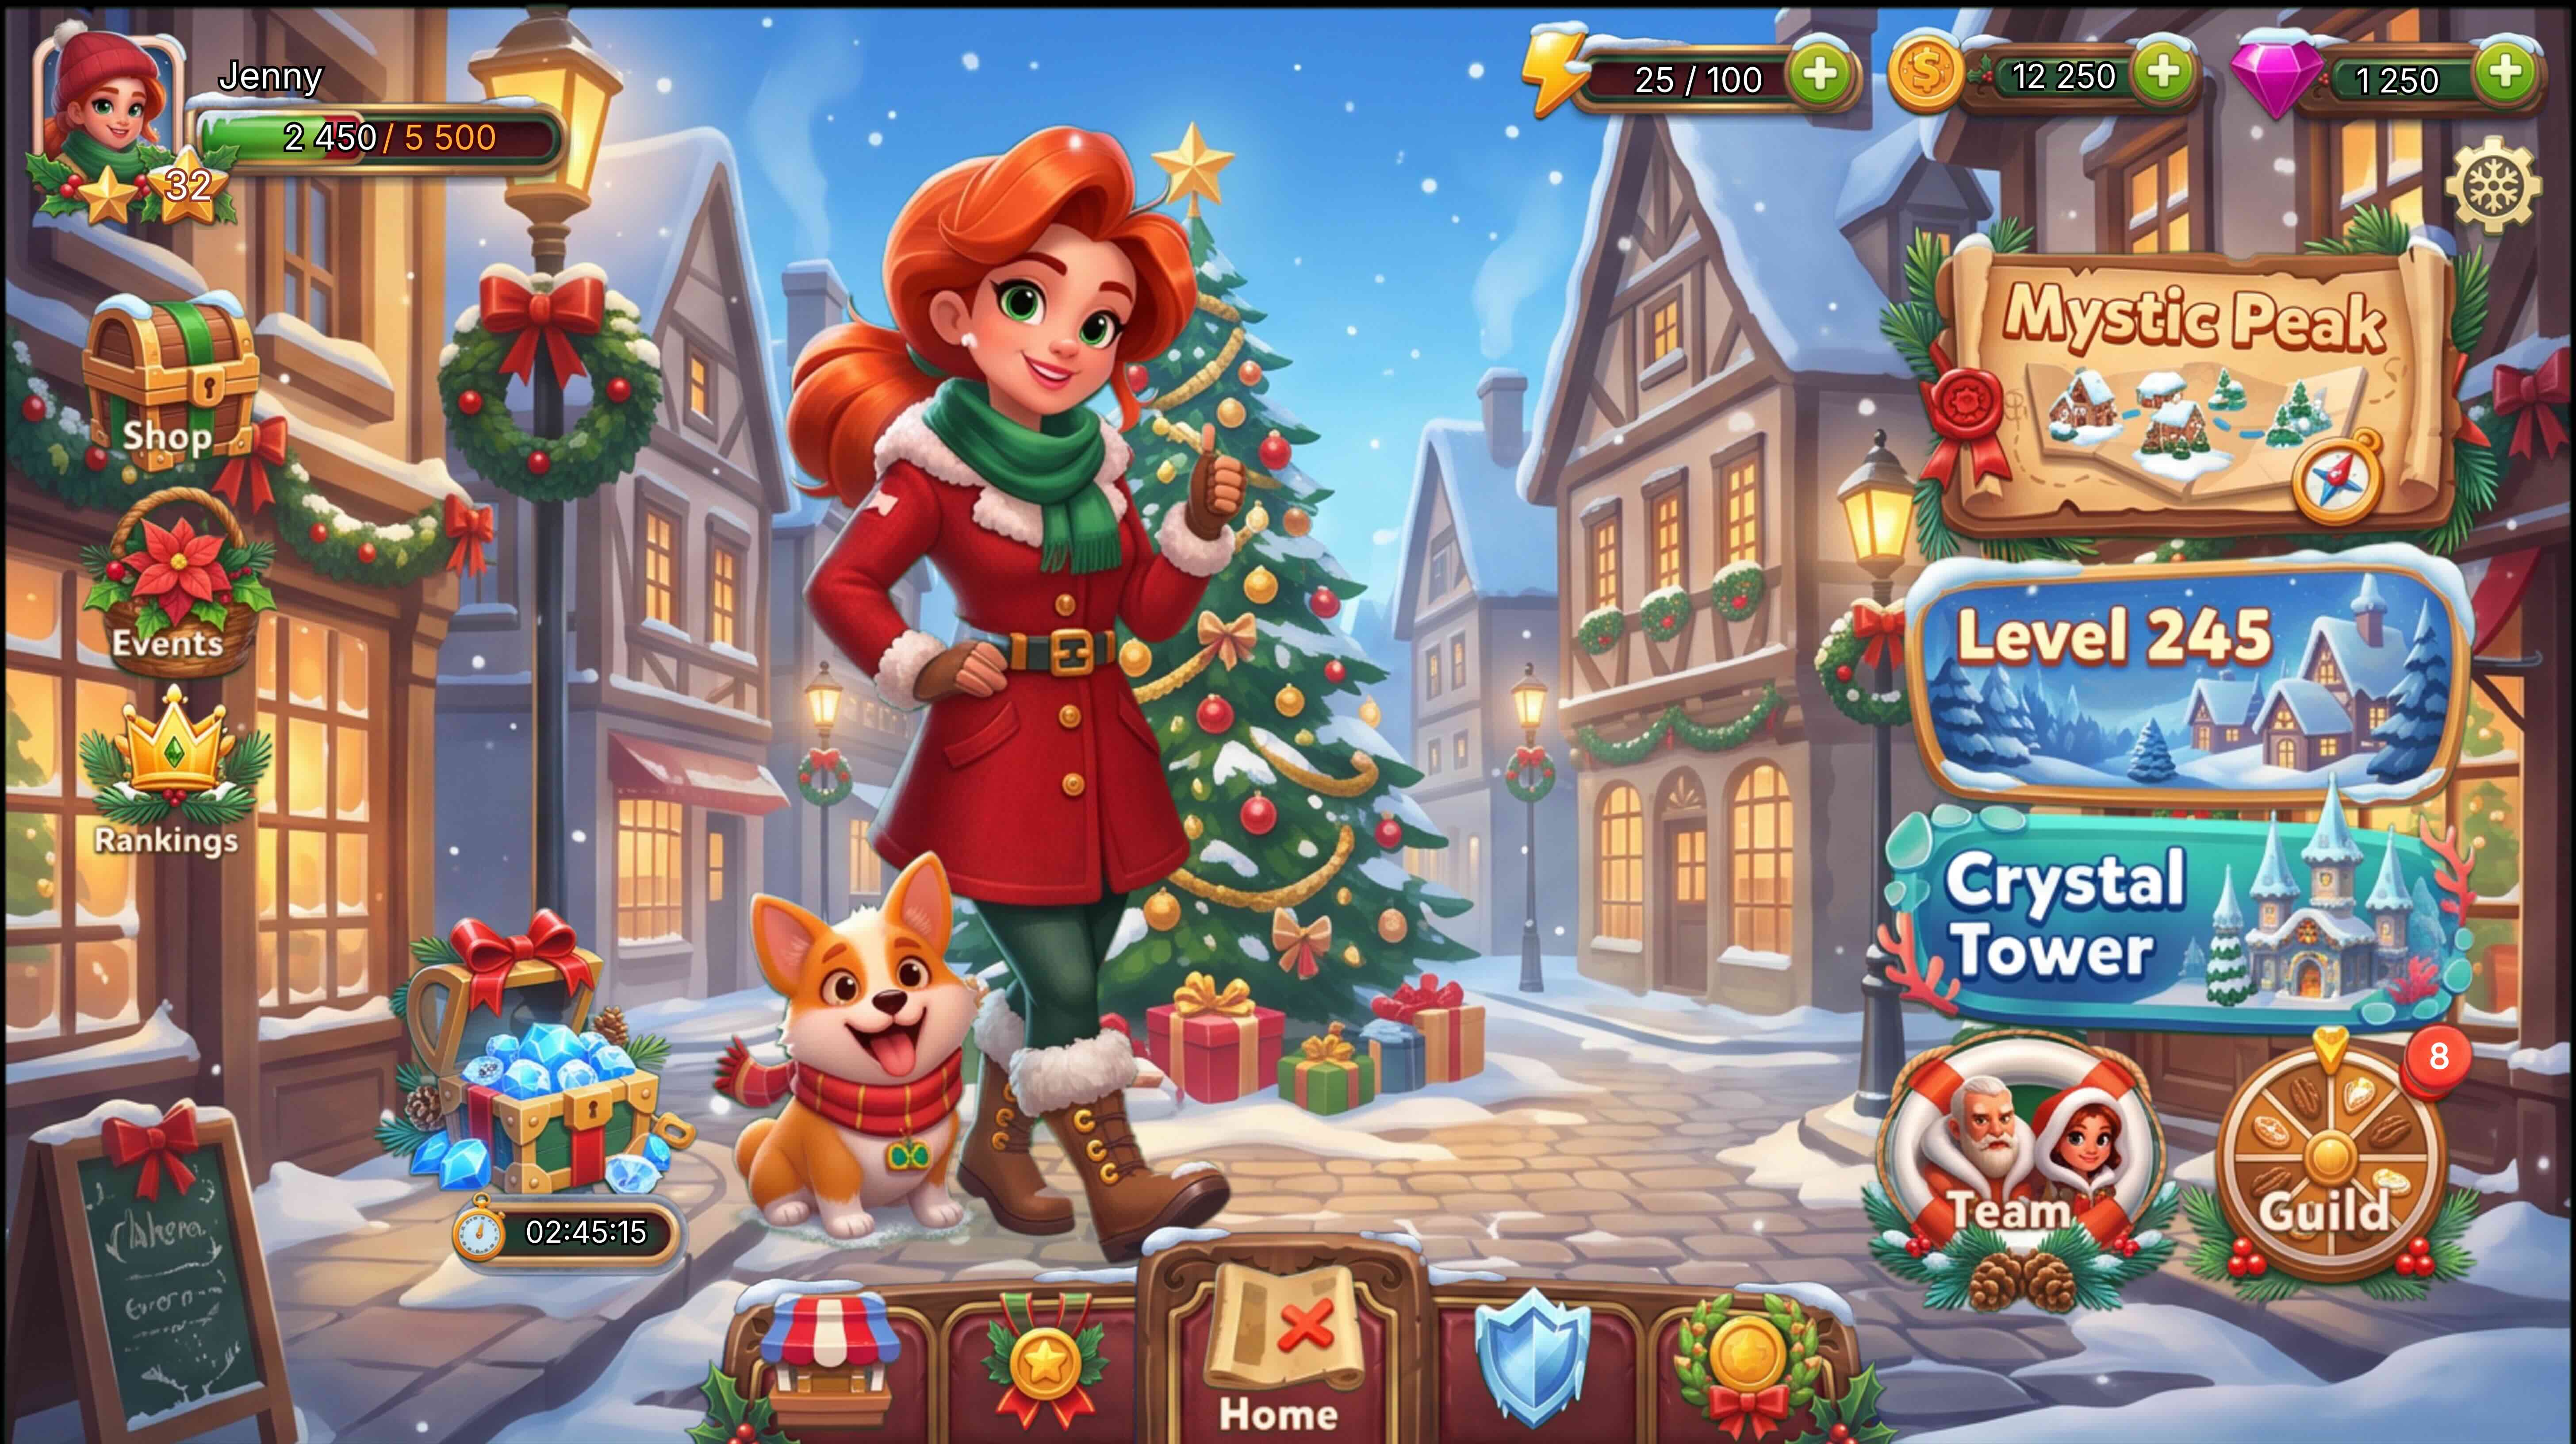
Case 2: Classic cartoon home → Christmas cartoon home
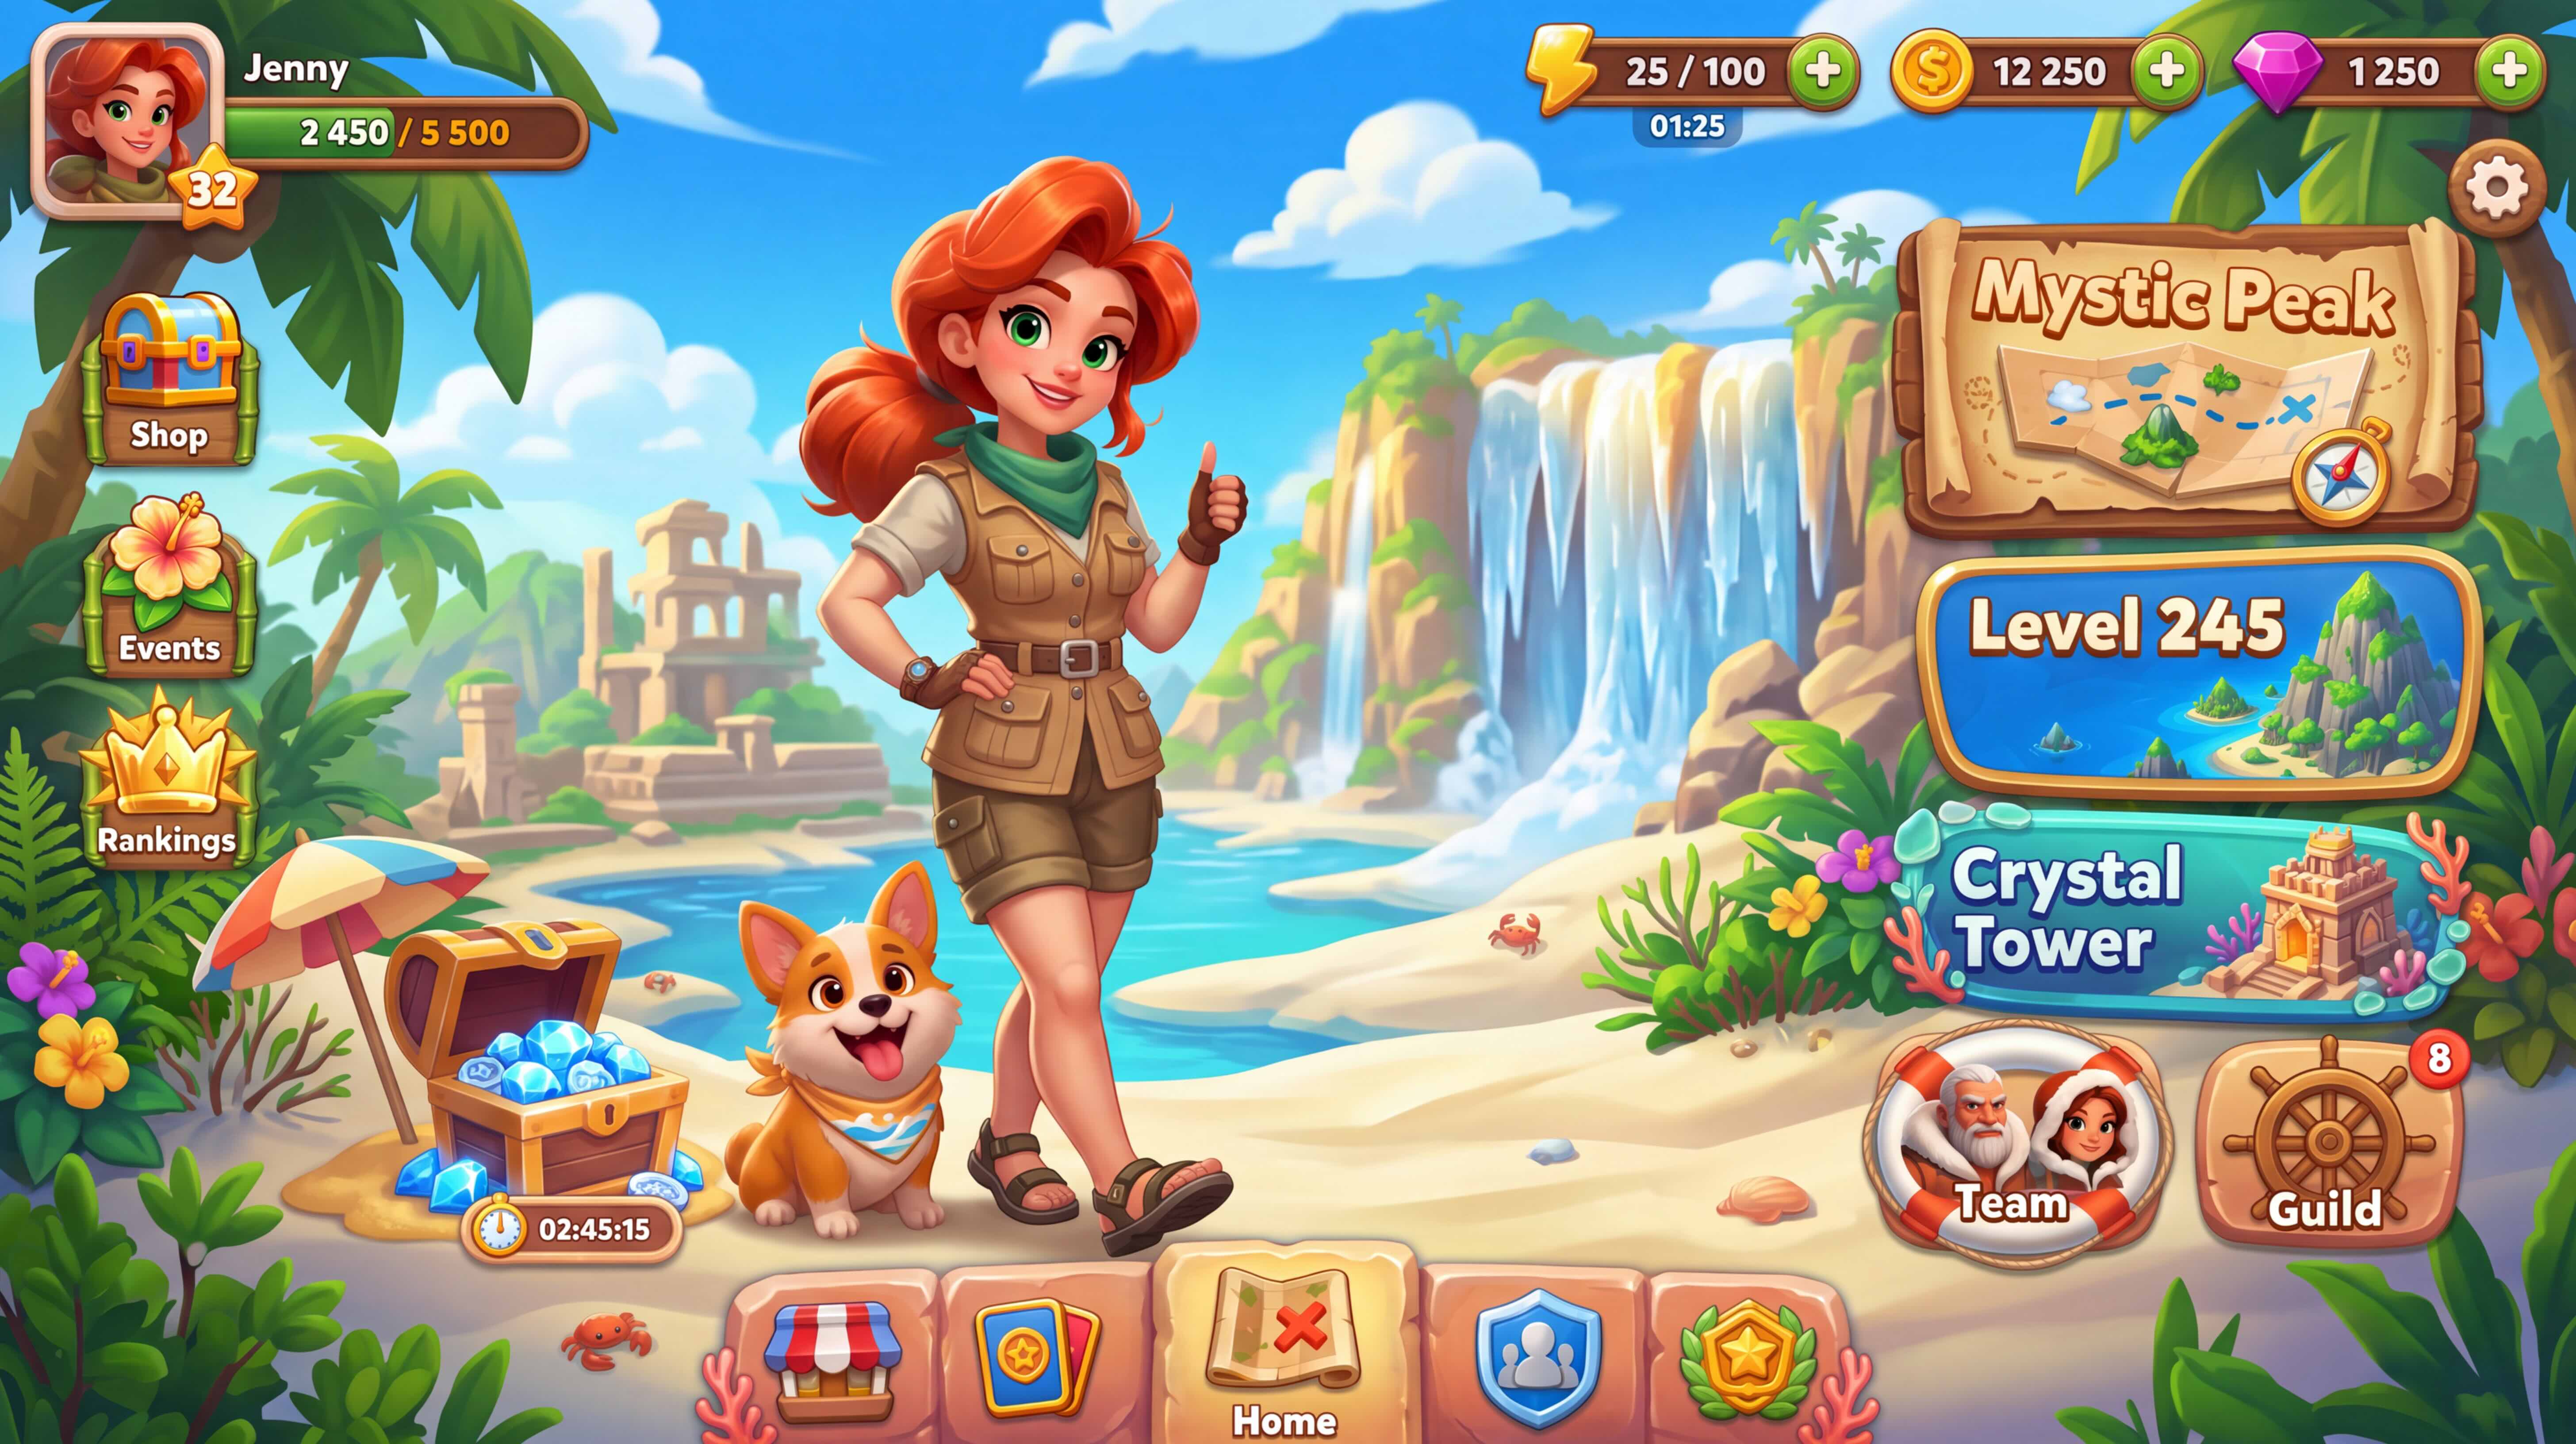
Same cartoon game home screen, one click to a Christmas theme (snow, gifts, warm festive accents). Good for event weeks: node and hit-area positions stay; art ships the visual variant first.
How this stacks with other Studio paths
| Need | Path |
|---|---|
| Same layout, many festival / theme skins | This article: one-click reskin |
| Flat full-screen art into the engine | In-place slicing, Split UI into the engine |
| Existing Figma / PSD layers | Figma→Unity and related guides—import directly |
| Wire buttons and scripts in-engine | Engine MCP workflow |
Limits
- Reskin locks geometry and hierarchy; still review complex fonts, localization, and motion by eye.
- Strict brand rules (fixed palette, banned motifs) need a reference plus clear “do not” notes—not a vague single word.
- Reskin does not replace gameplay or balance, or final Theme / nine-slice polish in-engine.
- VberAI Studio ≠ Google AI Studio — see the comparison.
Summary
Festival, event, and theme skins are almost always required; the expensive part is rarely “invent another look”—it is redrawing, re-slicing, and re-aligning the same layout. VberAI Studio keeps full-screen UI → preset / reference reskin → structure fully preserved on one canvas, then slice and export as needed. Product: AI Studio.
FAQ
What is VberAI one-click reskin?
In VberAI Studio, restyle a full-screen (or selected) game UI while the shell structure matches the source completely—no rearrange.
Does the layout really stay the same?
Yes. Layout, position, size, and layer order match the pre-reskin screen one-to-one. Review theme mood and label color next.
Preset vs reference image?
Presets fit common festival / style directions. References lock specific materials, IP mood, or brand look. You can combine both with a short prompt.
Is reskin the same as in-place slicing?
No. Reskin changes look; slicing turns a full screen into layered engine assets. Usually reskin first, then slice.
What is it good for?
Halloween, Christmas, and other event skins, season themes, and multi-look comparisons on one shell.
Keep reading
More guides you might like
VberAI Godot MCP: Install Plugin & Enable in Godot 4
VberAI Godot MCP install: download plugin, add to addons, enable in Godot 4, start server, verify godot-mcp in Cursor or Claude Code.
- godot
- mcp
- cursor
- tutorial
Godot 4: Put Signal Rules in Your Prompt So MCP Wires the Health Bar
Before asking Godot MCP in Cursor, define a health_changed signal contract so the HUD connects without deep get_node paths—prompt templates, GDScript samples, anti-patterns, and Play acceptance.
- Godot MCP
- Godot 4
- signals
- HUD
PSD to Unity UGUI Prefab: Slice a Photoshop PSD with AI
PSD to Unity prefab workflow in VberAI Studio: slice a layered Photoshop PSD, export Unity UGUI hierarchy and Prefab—not loose PNGs to rebuild by hand.
- vberai
- ai-studio
- psd
- unity