
Connect Codex or ChatGPT to Unity MCP
Connect Codex or ChatGPT to Unity MCP: Unity steps match install guide. Codex Open/Copy. ChatGPT STDIO: relay, --port, Assets root. Verify Hierarchy. VberAI.
- unity
- mcp
- codex
- chatgpt
- tutorial
- unity-mcp
- ai
What this guide covers
How do you connect Codex or ChatGPT to Unity MCP? Unity-side steps (import, activate, start the server) match Unity MCP install and Claude Code + Unity MCP. This guide is client MCP configuration only—Codex Open/Copy and ChatGPT STDIO setup.
Two paths:
- Codex CLI — in One-click Configuration, choose Codex CLI, then Open (automatic) or Copy a
config.tomlsnippet - ChatGPT desktop or web — no Open; map the copied relay settings into the STDIO MCP form (command, arguments, Unity project working directory)
When you finish, you should have:
- Unity MCP Server Running in the editor, with the port shown in the panel
- unity-mcp (or equivalent) registered in the client with tools visible
- A read-only prompt that lists root GameObjects in the active scene Hierarchy
Product: Unity MCP
Prerequisites
| Item | Notes |
|---|---|
| Unity | 2022.3+ / Unity 6 recommended (see current vendor support notes) |
| Unity MCP | Imported and activated (install guide) |
| Server running | Panel shows Running; note the port (6589 is a common default—use your panel) |
| Codex CLI or ChatGPT | MCP support with a custom STDIO server |
| Unity project | The project you want the agent to use is open in Unity |
| Local network | The bridge usually listens on 127.0.0.1—do not expose the port on the public internet |
The --port value must match the Unity MCP panel, not a fixed number from a blog or screenshot.
Part 1: Unity (same as install guide)
If Unity MCP is not set up yet, follow Unity MCP install: Add package from disk → activate in the MCP panel → Start service until Running → enable tools under Tool management.
The steps below assume Unity is already Running.
Part 2: Codex CLI
- Unity MCP panel → One-click Configuration → Codex CLI
- Open to write MCP config, or Copy for manual
config.toml - Example shape only—use your copied paths and port (Windows paths differ from macOS):
[mcp_servers.unity-mcp]
command = "/Users/<you>/.unitymcp/relay/<relay-id>/unity-mcp-relay"
args = ["--stdio", "--port", "<panel-port>"]- Restart Codex CLI or reload MCP per Codex docs
- Confirm unity-mcp and its tools appear
For full Unity + CLI context, see Claude Code + Unity MCP (same Unity steps, different client).
Part 3: ChatGPT desktop or web
In the Unity MCP panel, use Codex CLI → Copy for relay settings, then map TOML fields to ChatGPT. When adding a server you may set Name and Type (STDIO). When updating an existing Unity-mcp entry, the fields below match the screenshot.
| ChatGPT UI (English) | Value |
|---|---|
| Name (when adding) | unity-mcp (same as the TOML section name) |
| Type (when adding) | STDIO (not HTTP/SSE) |
| Start command | Full path from command = "..." to unity-mcp-relay (use Copy output on Windows, Linux, or macOS) |
| Parameters | Three lines: --stdio → --port → numeric port from the panel |
| Environment variables | Leave empty |
| Environment variable inheritance | Leave empty |
| Working directory | Unity project root (folder that contains Assets). Avoid generic defaults such as ~/code |
ChatGPT desktop UI reference
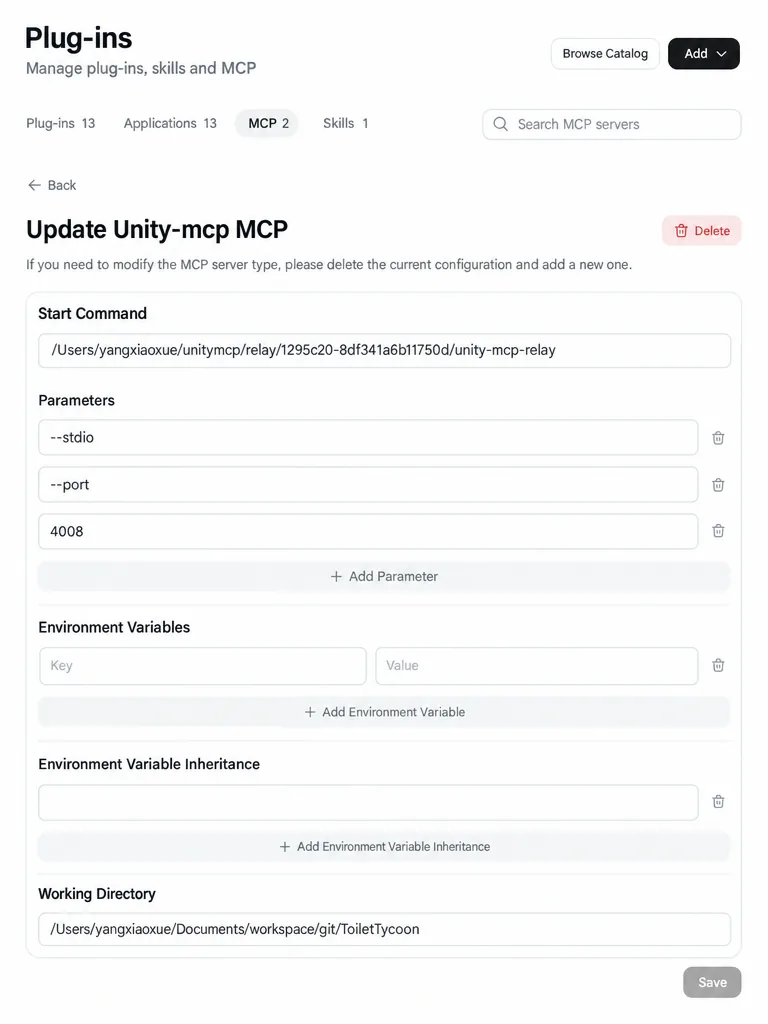
Relay path, port, and project folder in the screenshot are examples only—use your panel Copy output and your local Assets parent path.
Click Save, then fully quit and restart the ChatGPT desktop app (on web, refresh and start a new session before testing MCP).
Why working directory matters
The relay talks to ChatGPT over STDIO but still needs the Unity project root for the editor you have open. Change this path when you switch projects.
What the copied settings mean
unity-mcp-relay— local relay between the MCP client and Unity MCP Server in the editor--stdio— run the relay as a subprocess with standard input/output--port— must match the Running service port; wrong port or a stopped server causes failures or timeouts
Verify the connection
Send a read-only prompt first, for example:
List the root GameObjects of the active Unity scene via MCP.
If the reply matches the Unity Hierarchy, try a small write (e.g. create empty GameObject MCP_SmokeTest, then delete it). Commit to version control before large changes.
If the server is Running but the editor is missing from active instances, see Unity MCP install FAQ.
Client cheat sheet
| Client | Typical panel action |
|---|---|
| Cursor | One-click auto configure |
| Claude Code / Gemini CLI | Copy CLI command → run in terminal |
| Codex CLI | Open or Copy → config.toml |
| ChatGPT desktop / web | Copy relay settings → STDIO form + working directory |
Overview: Which AI clients Unity MCP supports
FAQ
Does Codex Copy work for ChatGPT?
Yes—the same command and arguments; ChatGPT also needs the correct working directory.
MCP connection failed in ChatGPT?
Check: Unity Running; --port matches the panel; relay path exists and is executable; working directory is the Assets parent; Save and restart the client.
No Unity tools in Codex?
Try panel Open again, or re-paste Copy into config.toml and restart Codex. Still stuck → active instances.
Do I still hand-write all C#?
For day-to-day scripts, AI can create and attach components via MCP—you review changes, compile, and test in Play mode. Keep human ownership of architecture, networking, and hot paths (clients FAQ).
Next steps
- Cursor / Claude workflow on Unity MCP
- Do you need MCP for Godot? (Godot-focused; this guide is Unity-only)
Keep reading
More guides you might like
Game UI Design: Traditional Workflow vs AI Art + VberAI Studio In-Place Split
Compare PS/Figma hand slicing with VberAI Studio: import or AI-generate UI, auto split layers, export layered PSD or image sets. Effects, steps, and demo video…
- game-ui-design
- game-ui-designer-flow
- ui-slicing
- AIGC
PSD to Unity UI in 5 Min (AI Studio)
PSD to UI importer for Unity: layered PSD to prefabs with VberAI AI Studio—structure import, psd to unity tips, re-import vs patch.Most game UI still starts in…
- vberai
- ai-studio
- unity
- psd
Unity Game Engine MCP Plugin: Boost Your Game Development Workflow
Walk through the VberAI Unity MCP Plugin demo: connect Unity to AI tools via MCP and drive GameObjects, scripts, and scenes with natural language.In this artic…
- video
- tutorial
- unity
- mcp