
Connect Claude Code to Unity MCP: Install, Configure & Verify
Use Claude with Unity MCP: Add package from disk, activate, start MCP Server (6589), copy Claude CLI command, verify Hierarchy read/write.
- unity
- mcp
- claude-code
- tutorial
- unity-mcp
- ai
Use Claude with Unity MCP — What This Guide Covers
Follow these five steps to connect Unity MCP to a local Unity project so Claude CLI can operate, preview, and debug the editor—not just edit scripts on disk. The same bridge works with Cursor—see Unity MCP with Claude Code and Cursor.
When you finish, you should be able to:
- Import Unity MCP via Package Manager Add package from disk
- Complete plugin activation (account or activation code—follow your Mcp Panel)
- Start the local Unity MCP Server (default port 6589)
- Copy the CLI command from Quick setup, run it in Claude CLI, and confirm the MCP connection
Download page: Unity MCP
This guide uses Claude CLI. For Gemini CLI, pick the matching client in Quick setup and copy its CLI command the same way.
Prerequisites
| Item | Notes |
|---|---|
| Unity | 2022.3+ / Unity 6 recommended (follow the current support notes for your build) |
| Plugin package | Downloaded and unzipped Unity MCP archive |
| Activation | Plugin account + password, or email + activation code (per Mcp Panel) |
| AI IDE | Claude CLI (same flow for Gemini CLI) |
| Local network | The MCP bridge usually runs on 127.0.0.1—do not expose the port publicly |
Step 1: Download Unity MCP
Download the plugin from your Unity MCP vendor’s site or release page:
Example download page: https://www.vberai.com/game-engines/unity?ch=CQZLC2FG
Suggested flow:
- Open the download page and get the Unity MCP archive
- Save it locally and unzip to a fixed folder (next step needs
package.jsoninside) - Confirm
package.jsonexists in the unzipped folder before opening Unity
Licensing and edition differences vary by vendor—follow their official docs.
Step 2: Import the package
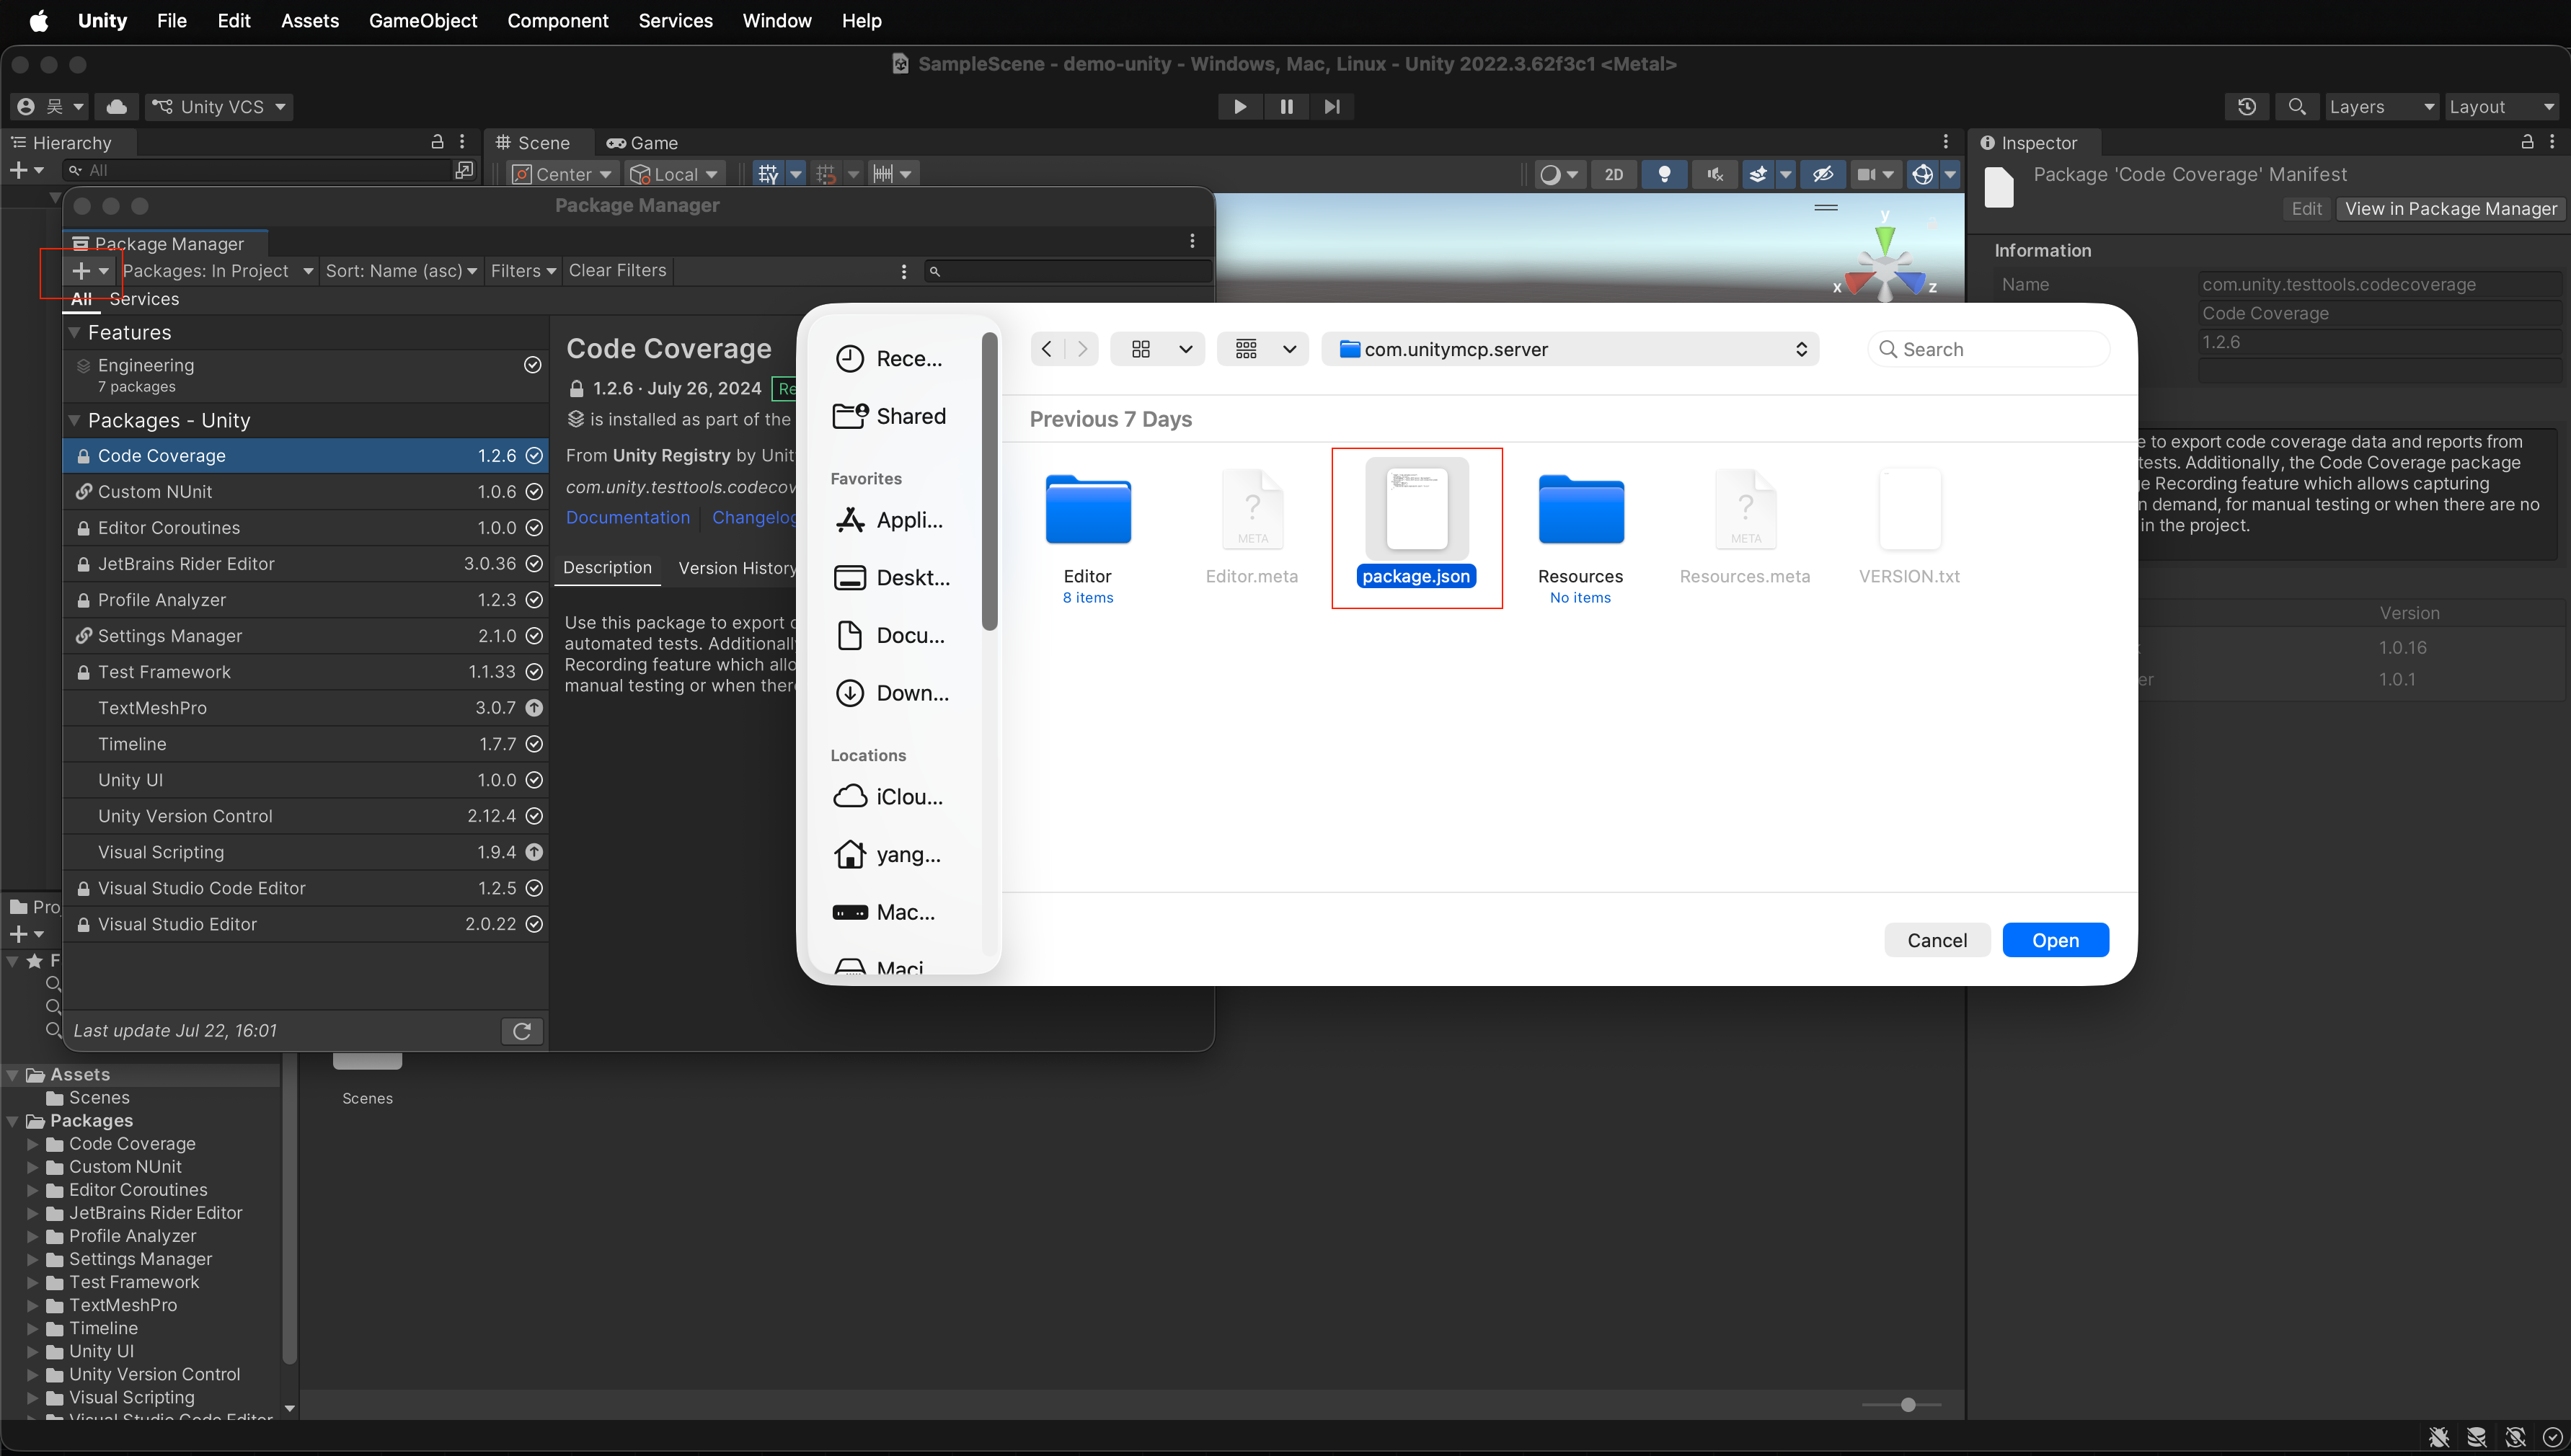
- Open your target Unity project
- Menu Window → Package Manager
- Click + in the top-left of the Package Manager panel
- Choose Add package from disk
- Select the
package.jsonfile from the unzipped folder in Step 1
After a successful import, the Unity MCP package should appear in the Package Manager list.
Step 3: Activate unity-mcp
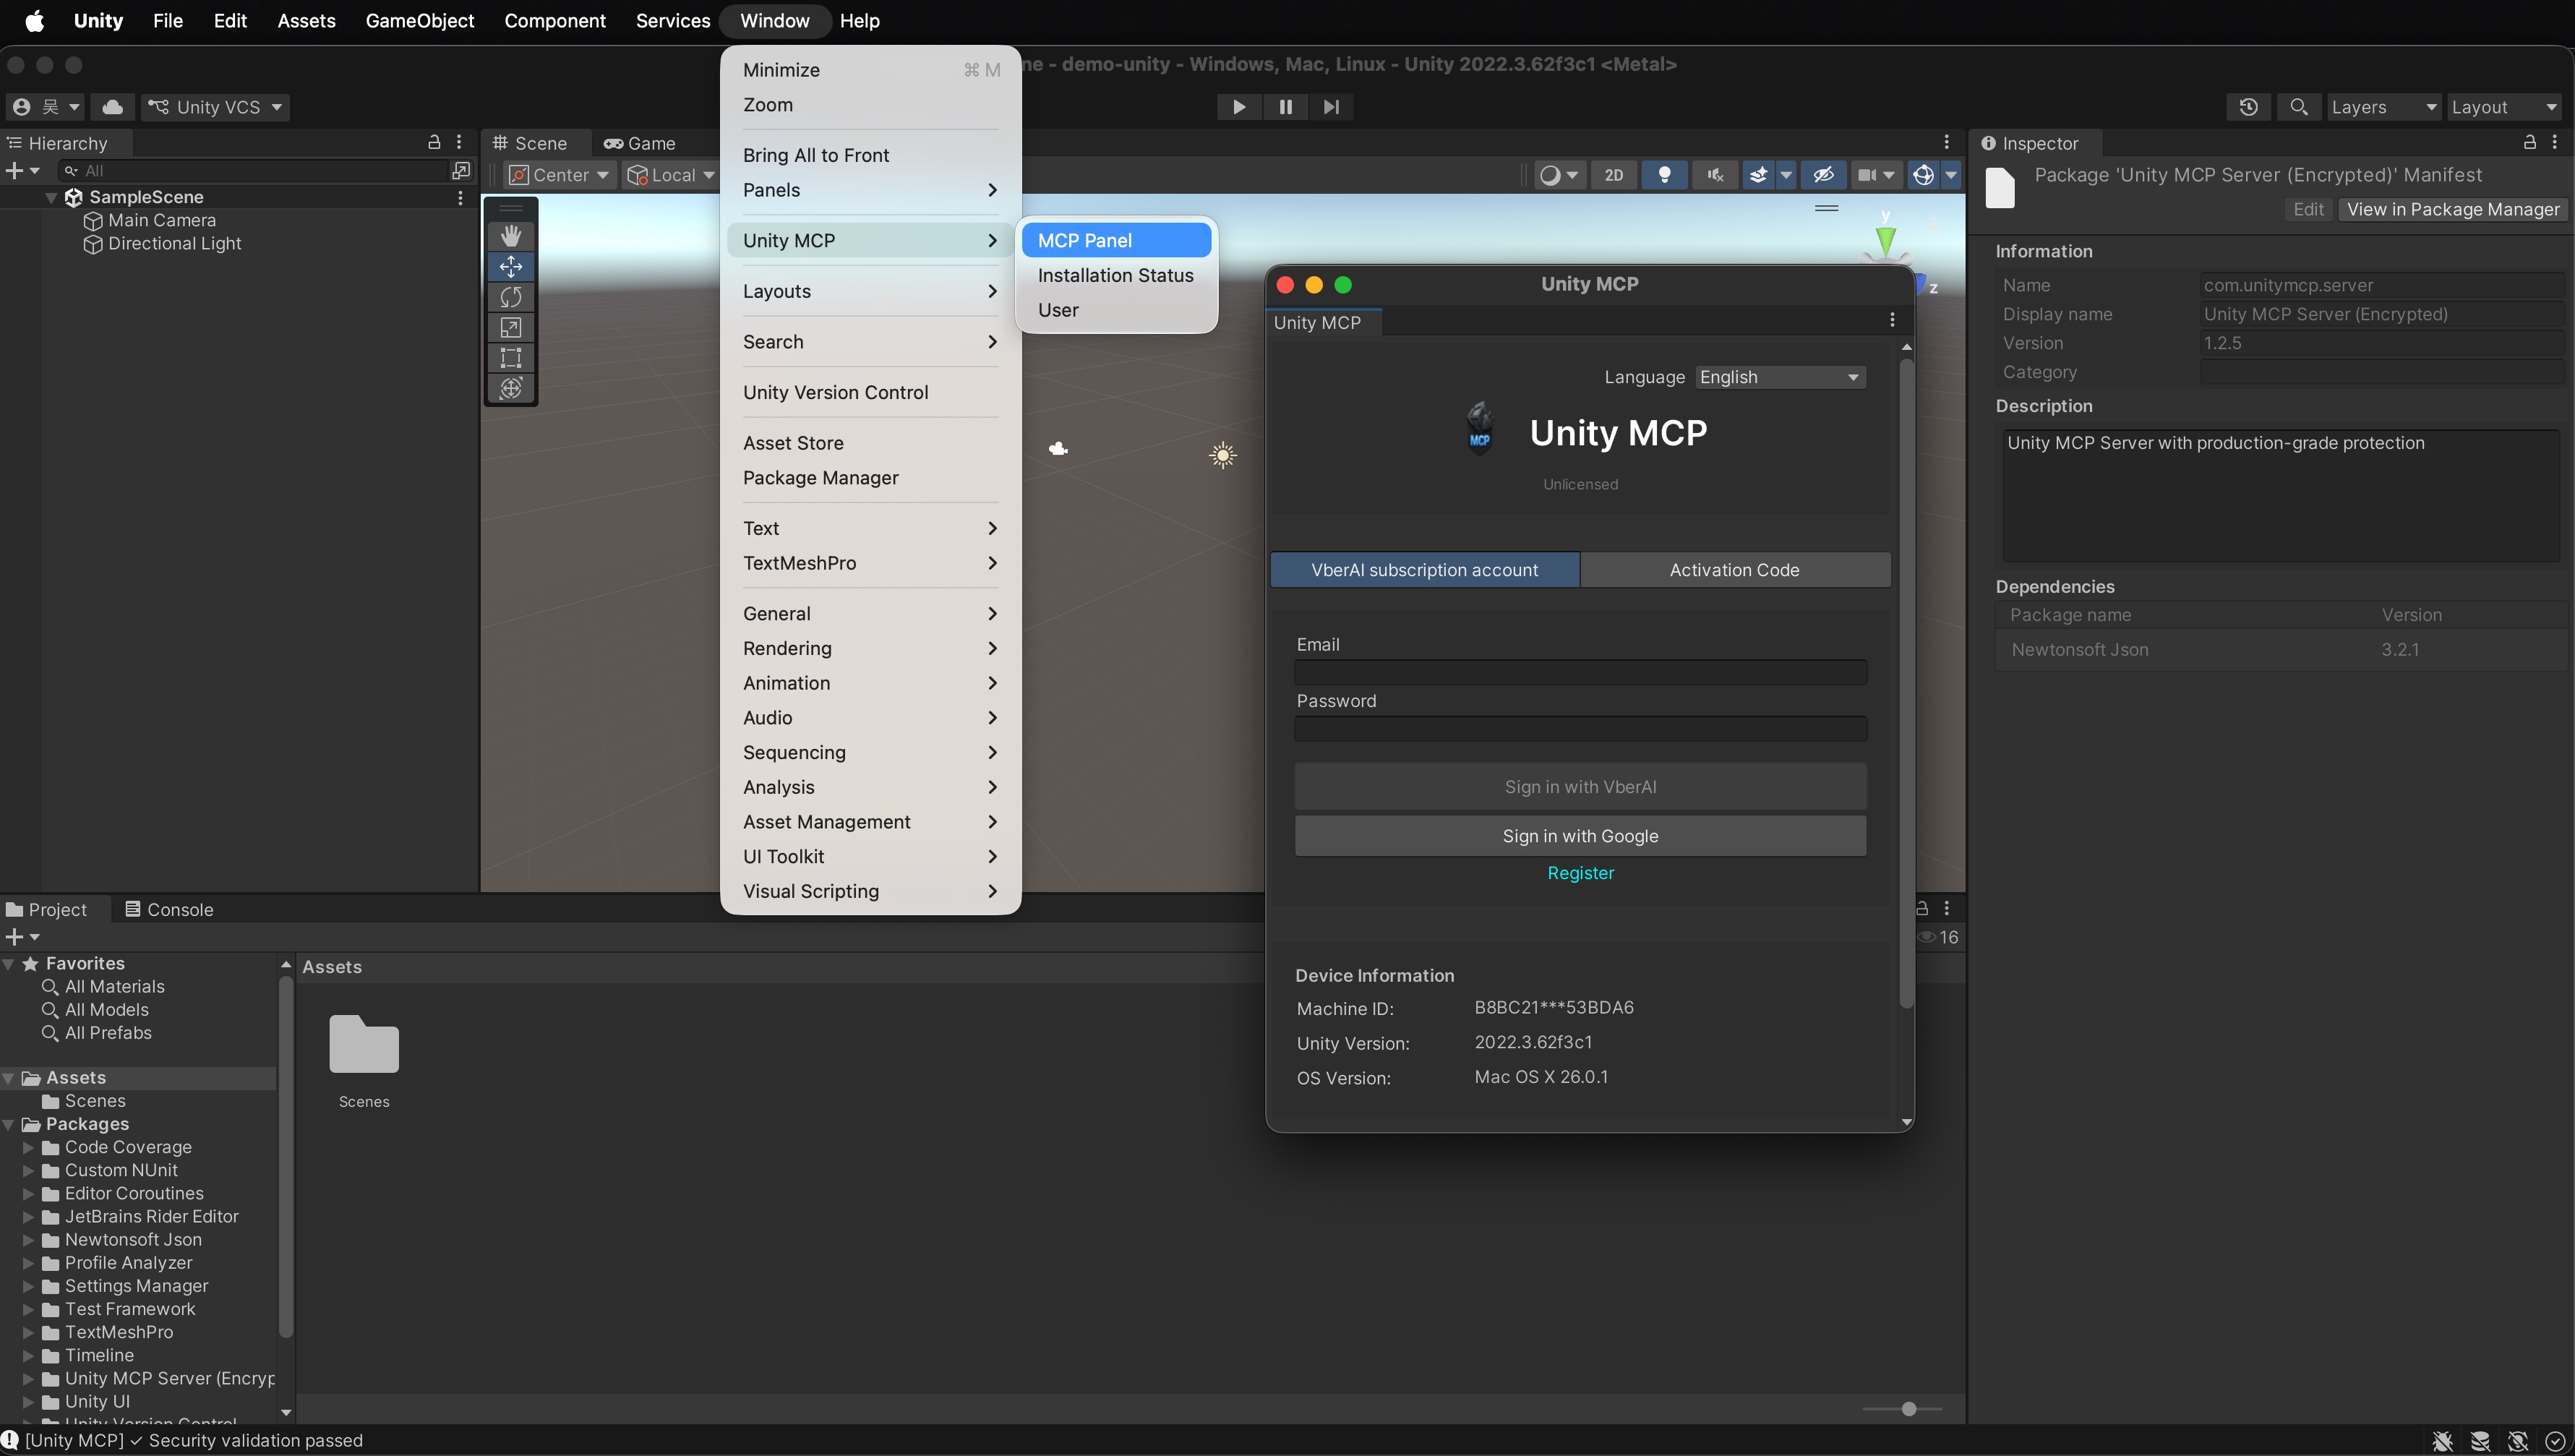
- Menu Window → Unity MCP → Mcp Panel
- On the activation screen, either:
- Sign in with account + password
- Or enter email + activation code
- After activation succeeds, open the MCP Server settings page (next step)
Without activation the service usually will not start. Confirm your account or code matches the plugin version you installed.
Step 4: Start unity-mcp-server
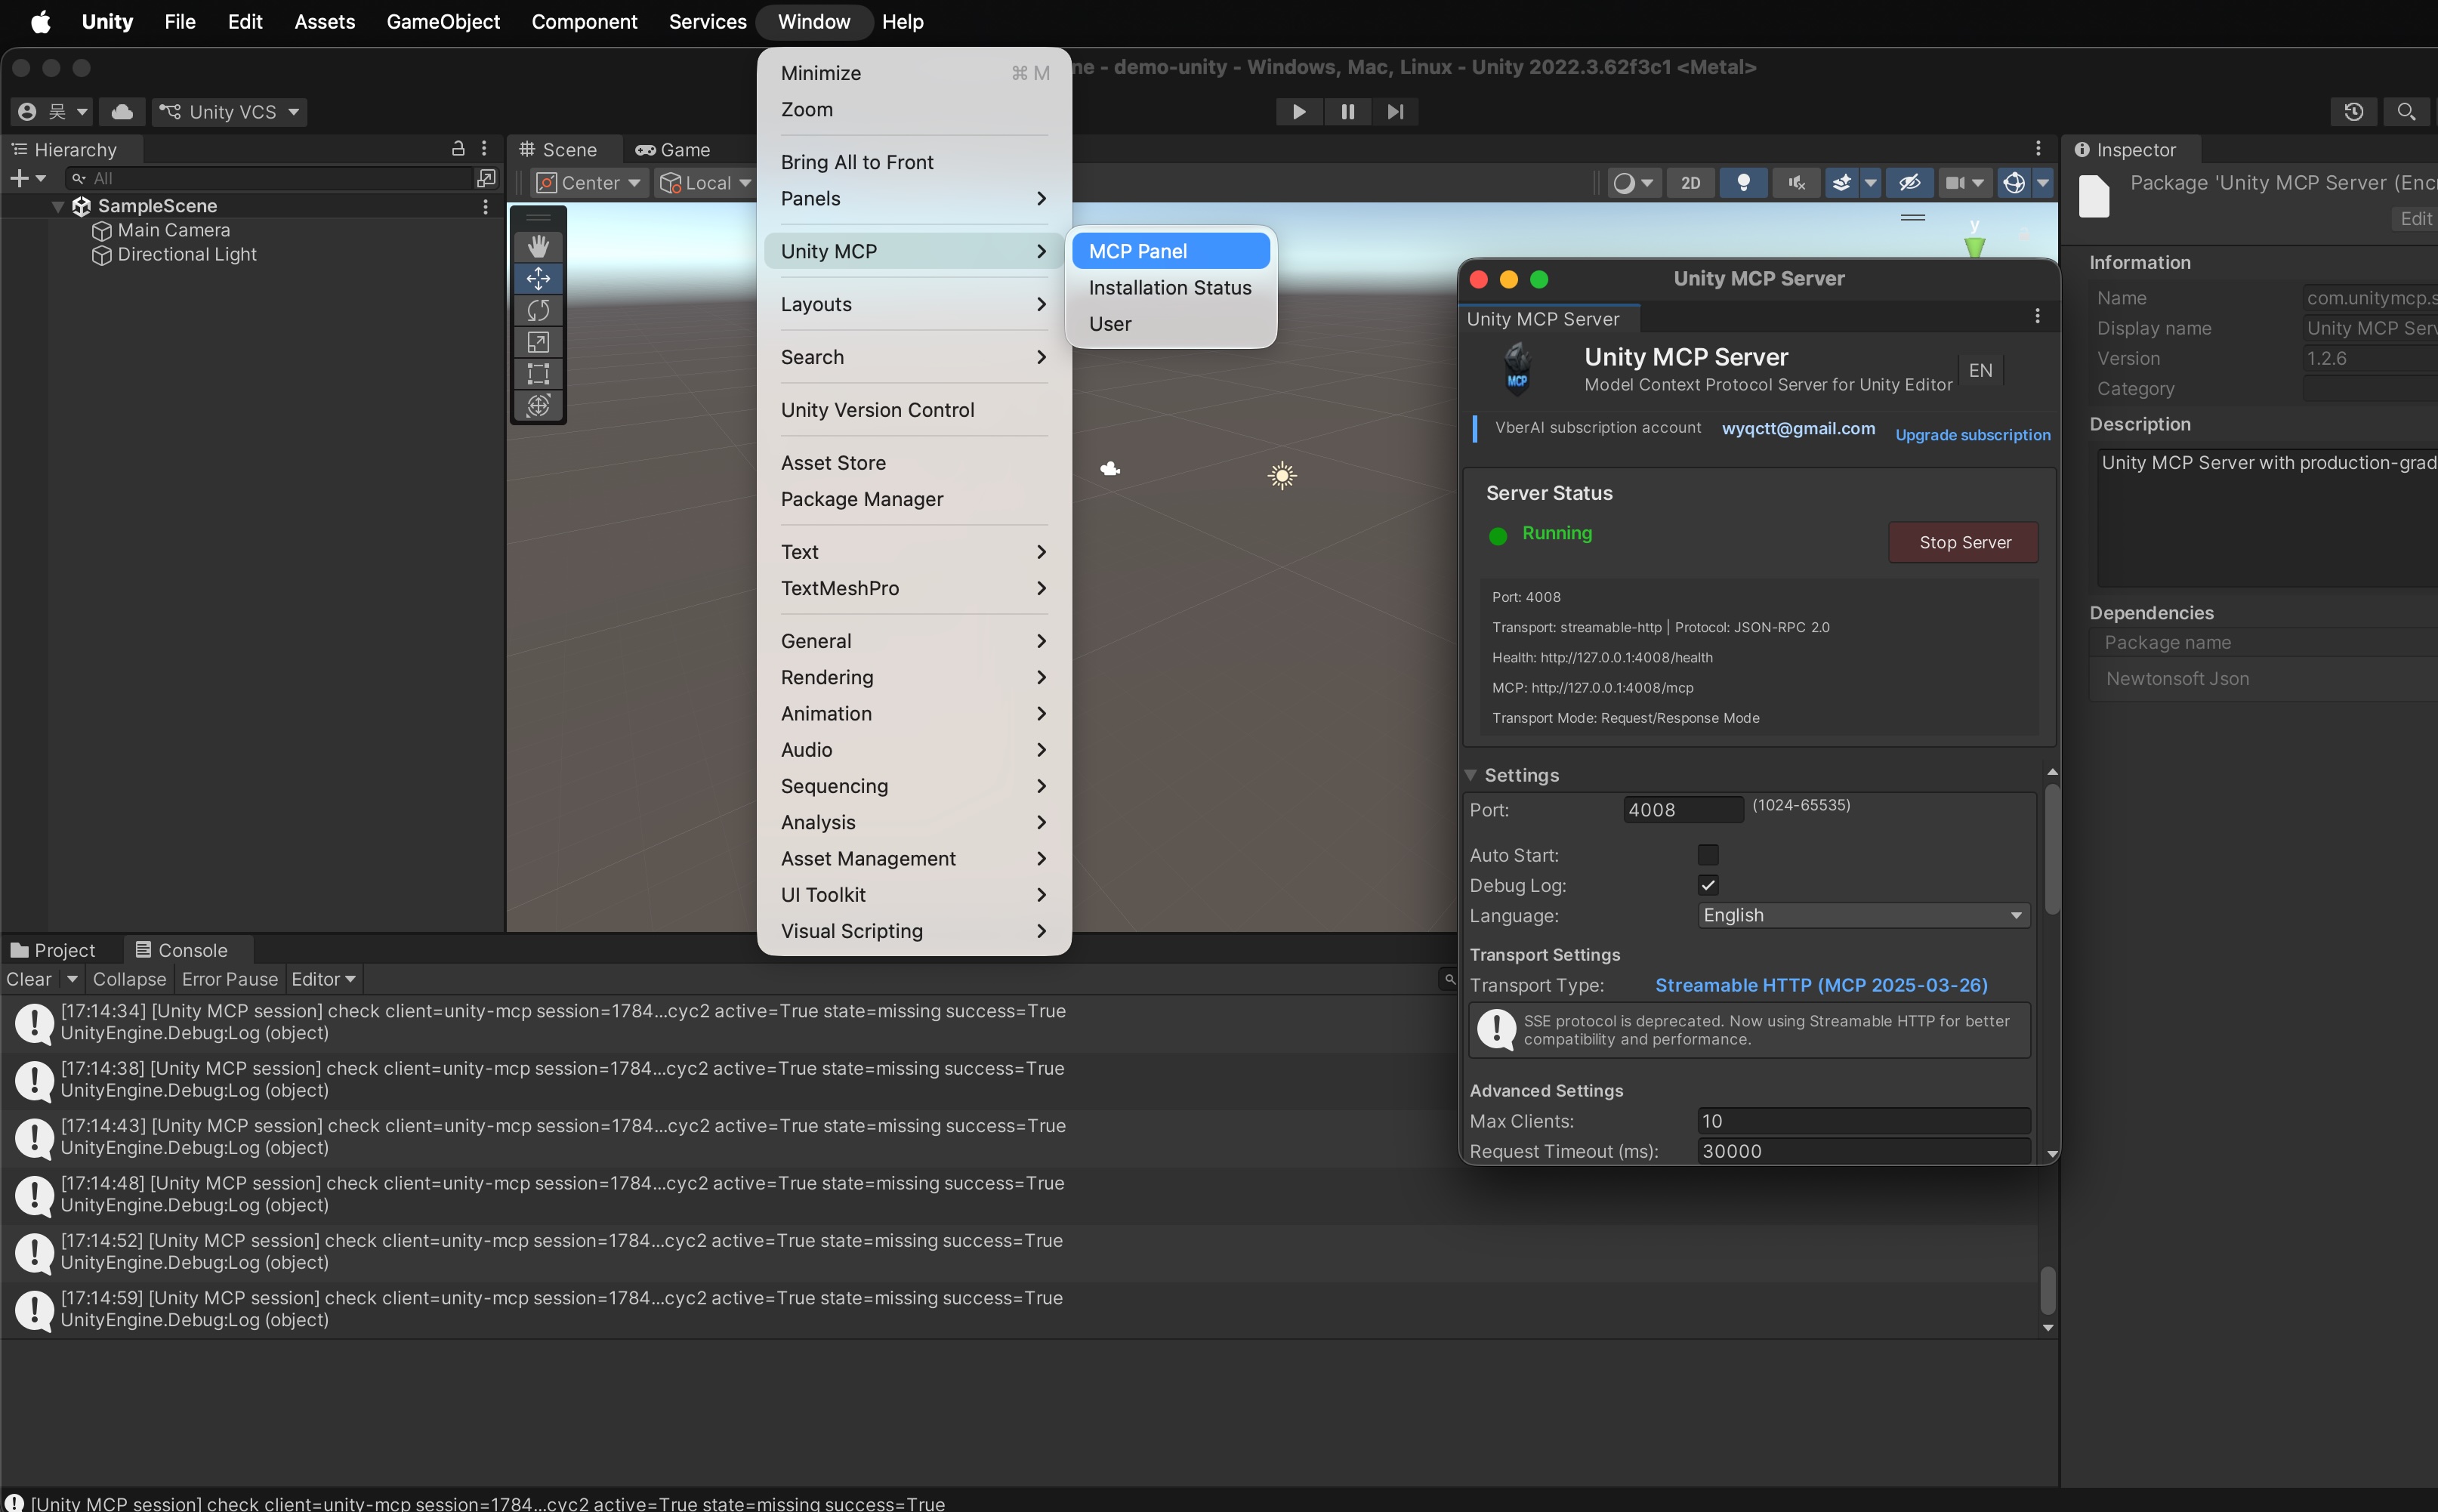
- After activation, open the Unity MCP Server settings page
- Adjust as needed:
- Port: default
6589 - Language: match your UI preference
- Startup: follow panel options (e.g. auto-start with the editor, if available)
- Port: default
- Click Start service
- When the panel shows Running, Unity MCP Server is up
You now have a local MCP bridge—next, configure Claude CLI.
Step 5: Configure Claude CLI
- Open Tool management
- Review tools exposed by Unity MCP Server
- Enable only what you want the model to use
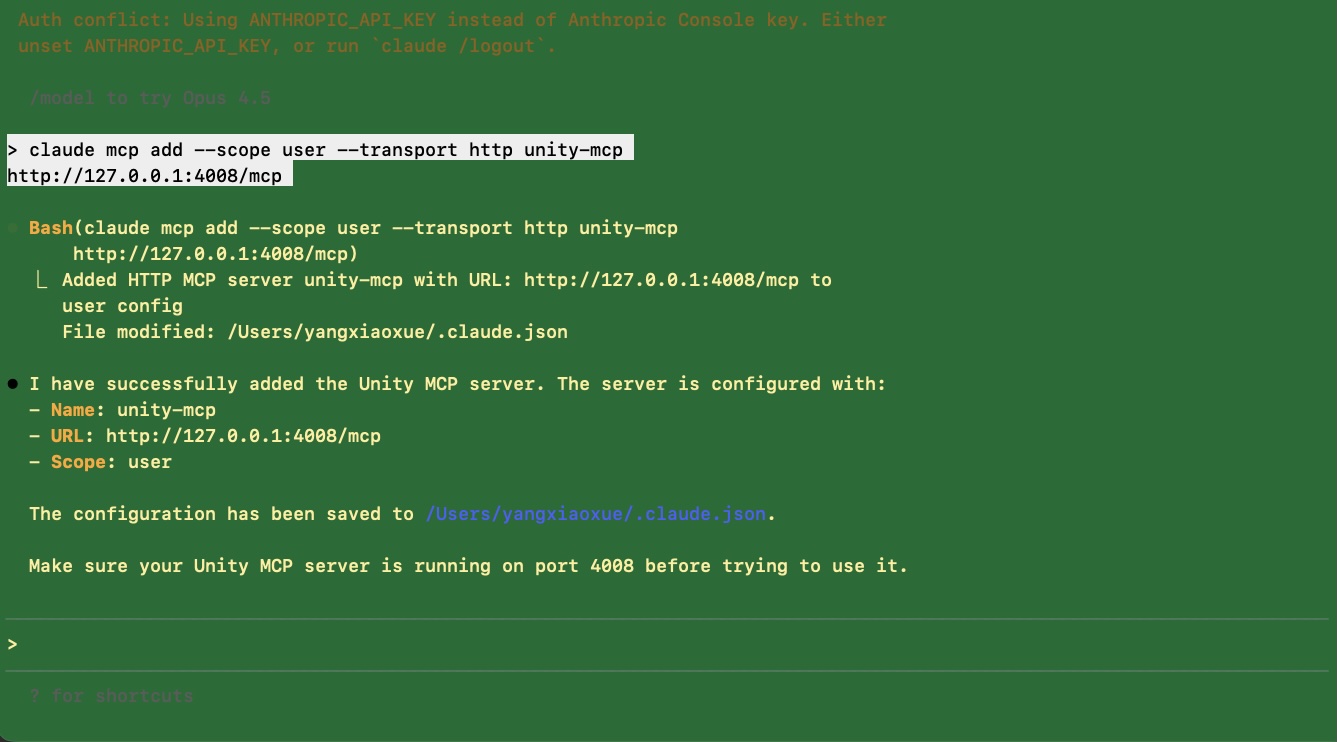
- Open Quick setup
- Pick Claude CLI (Gemini CLI works the same—select that client)
- Claude CLI / Gemini CLI do not support Auto configure—click Copy on the CLI command shown in the panel
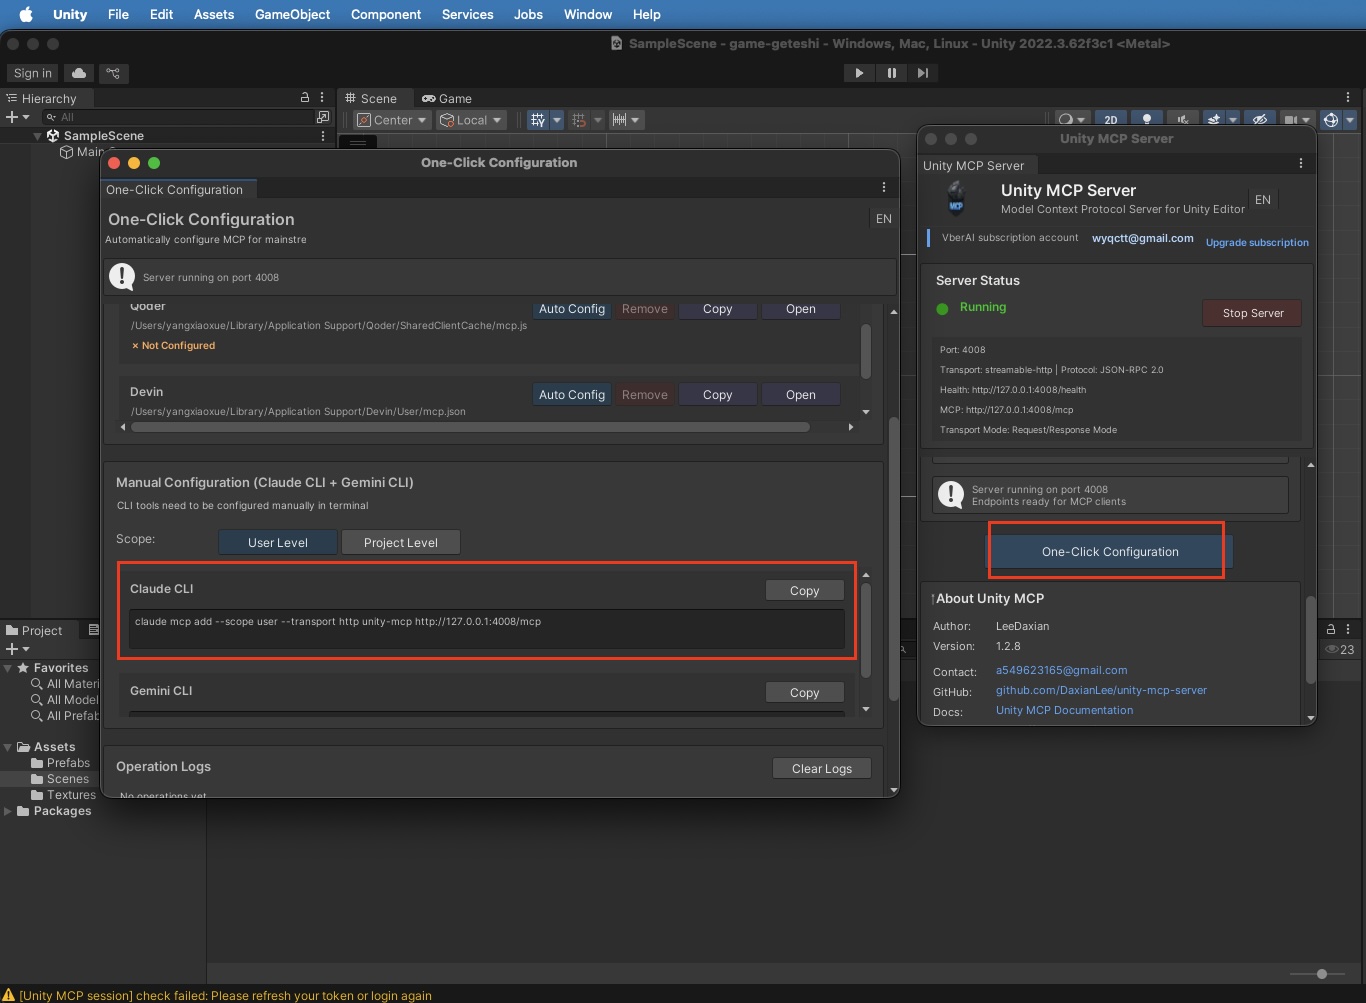
- Open a system terminal, paste, and run the copied command (in an environment where Claude CLI is installed)
- Return to Claude CLI and confirm unity-mcp (or the equivalent registered name) appears in the MCP list
Quick check after connecting
In Claude CLI, start with a read-only check, for example:
List the root objects in the Hierarchy of the scene currently open in Unity.
If the reply matches the editor, the bridge is healthy. Then try a small write (create a temporary empty GameObject and delete it) to confirm permissions and tool selection.
FAQ
How do I use Claude with Unity MCP?
Import Unity MCP via Add package from disk, activate in Mcp Panel, start Unity MCP Server, copy the Claude CLI command from Quick setup, run it in terminal, then verify Hierarchy listing in Claude CLI.
Claude Code vs Cursor for Unity MCP?
Both work if they support MCP and point at the same localhost bridge. Cursor uses Quick Setup → Auto configure; Claude CLI copies a terminal command—see workflow guide.
Add package from disk cannot find package.json?
Confirm Step 1 fully unzipped the archive and you selected package.json at the root of that folder—not a nested extract.
Activation keeps failing?
Check that your account or activation code is valid, not expired, and tied to the correct email, then retry in Mcp Panel.
Started the service but not Running?
Ensure port 6589 (or your custom port) is free and localhost is not blocked. Confirm Step 3 activation succeeded.
Claude CLI does not show unity-mcp?
Confirm Unity still shows Running; go back to Quick setup, copy the CLI command again, and run it fully in the terminal. Make sure you picked Claude CLI, not Cursor. For Gemini CLI, pick Gemini CLI and copy that client’s command.
Next steps
- Try a natural-language scene query or small edit to learn tool boundaries
- Commit before large changes; keep the bridge on localhost only
- Prompt patterns after connecting: Unity MCP with Claude Code and Cursor
Keep reading
More guides you might like
AI Studio Audio Layers: Score, Voice, and SFX on the Same Canvas
How VberAI Studio handles game audio: audio layers and floating tools, music/voice/SFX, libraries and asset management, track editing; attach audio to Spine, frame sequences, and video; generate SFX and character voices from text.
- AI Studio
- VberAI
- game audio
- SFX
Cocos MCP Connection Troubleshooting: Cursor Doesn’t Show cocos-creator
Symptom-based fixes for VberAI Cocos Creator 2.x / 3.x MCP: extension missing, activation failure, server not running, port conflicts, Cursor MCP not written or needs reload—plus a checklist and localhost verification.
- cocos
- cocos-creator
- mcp
- cursor
PSD to UI Importer for Unity: Import PSD in 5 Minutes with AI Studio
PSD to UI importer for Unity: layered PSD to prefabs with VberAI AI Studio—structure import, psd to unity tips, re-import vs patch.
- vberai
- ai-studio
- unity
- psd